WPPizza – Autoprint
Description
An extension for WPPizza to replace Google Cloudprint (which is to be disabled by google at year end 2020), to allow for autoprinting of WPPizza orders using different setups. However, be aware that this is not and cannot be a like for like plugin – there is simply nothing in existence that could directly replace Google Cloudprint as such, so please read the requirements below to decide which, if any , option might be suitable for you
Note: This is a relatively new plugin to fulfill the need to be able to move away from “Google Cloudprint”. Although tested of course, it is clearly impossible to test this with every printer in existence, so please contact me with as much information as you can give me if you experience any issues in your particular setup (Make sure to also see the “Troubleshooting” sections below). Thank you.
Overview
- Autoprint incoming orders using a Printnode compatible printer (printnode account required).
- Send a PDF of your order to a dedicated email address as an attachment – for 3rd party “Print Email Attachment” solutions (see: “Requirements – Email attachments” below for some suggestions)
- Save orders as PDF’s to an FTP account
- Save orders as PDF’s to your Dropbox account – for 3rd party “Print from Dropbox” solutions (see: “Requirements – Dropbox / Google Drive” below for some suggestions)
- Save orders as PDF’s to your Goolge Drive account – for 3rd party “Print from Google Drive” solutions (see: “Requirements – Dropbox / Google Drive” below for some suggestions)
- Supports common paper formats (A4, A5, A6 etc) as well as 80mm, 72mm and 64mm thermal printers
- Supports most character sets / languages
- Limitations: If using Printnode, a device has to be running with the Printnode client installed and running to autoprint your orders (unlike “Google Cloudprint” … unfortunately)
Requirements – General
- WPPIZZA 3.12.16+
- PHP 7.1+
- WordPress 5.5+ (lower versions might work too though)
- cUrl, DOM, MBString extension for php (usually installed by default
- Note: due to a number of fonts being included to support non-western character sets, this is quite a large plugin (about 19mb+ zipped)
Requirements – Printnode
- A Printnode account (Single) if you want to use it with printnode alongside a printnode compatible printer. Additional costs levied by printnode may apply.
- A device that supports installation of the Printnode client
Please note: Printnode claim to support all printers, but only have a – albeit relatively extensive – list of supported printers here, so if you want to make sure your particular printer is supported by printnode, please contact printnode themselves as I cannot advise on support for any particular printer
Requirements – Email attachments
- An existing email address (unsurprisingly).
- Useful if you want to use one of these suggestions here or things like automatic-email-manager (there may be other solutions/ideas too) to implement autoprinting in this way.
- Please note: unless you have issues sending/attaching your order PDF’s to your designated email to start off with, you will need to speak to your chosen software provider if you have any issues autoprinting email attachments. I have no knowledge of the inner workings of those systems other than knowing that they exist and cannot offer any support regarding their software
Requirements – FTP
- PHP FTP extension enabled
- An FTP account somewhere
Requirements – Dropbox / Google Drive
- A Dropbox or Google account if you simply want to save PDF’s of your orders to your Dropbox and/or Google Drive and perhaps use other/additional solutions – such as “Foldermill” for example – to autoprint from there (additional setup may be required as well as additional costs incurred)
- Please note: unless you have issues saving to Dropbox/GoogleDrive using this plugin to start off with, you will need to speak to your printprovider (foldermill etc) if you have any issues autoprinting from GoogleDrive/Dropbox. I have no knowledge of the inner workings of those systems other than knowing that they exist and cannot offer any support regarding their software
Installation
- install by uploading the zip file in the normal wordpress manner from within the plugin screen and activate, then follow the setup instructions below
A) Setup – General
- Go to “WPPizza -> Order Settings -> Autoprint Orders”
- Skip the “Methods” section for now.
- Select a “Page format” you want your orders to be printed at according to the format your printer supports and you want your printer to print the orders
- A note regarding thermal printers:
In many cases an 80mm page width will in fact only accept a 72mm print (or 72mm printer accepts maybe 64mm print and so forth) so it is quite possible that you need to set a smaller format for your printer (e.g 72mm Page Format for an 80mm printer) !!!
You can also explicitly set this with the “Custom Printwidth” to adjust this for your particular printer – refer to the printer manufacturer’s manual as to what print sizes it accepts (or simply determine the settings by trial and error… ) - Leave the “Custom Fontsize” settings blank to use defaults for the time being. If you find your fonts to be too big or to small once you have it all set-up, feel free to enter a distinct fontsize here later
- Leave the “Custom Print Margins” settings blank to use defaults for the time being. If you find your print margins (top/bottom, left/right) are too big or small with yoru printer, feel free to enter distinct margins here later
- Leave the “Custom Print Width” settings blank to use defaults for the time being. Especially with thermal printres, you might find that 80mm paper for example will only accept a 72mm print with (or your order detils might get cut off on the sides), so adjust this if necessary !
- Set the characterset (“Font”). Unless your site is using non-western, non-russian or non-arabic characters, I would recommend the default as it will produce better performance, else adjust as necessary
- For your own sanity, and to keep autoprint orders independent from your other print templates, a new, dedicated template will have been added in “WPPizza -> Templates -> Print” with some default values and selected as your “Autoprint Template”. Adjust the css/settings of that template as required if and when the need arises, so as to not have your autoprinting template interfere with any other template customisations you may have done.
- Once you have done so, choose which method you would like to use for autoprinting and/or sending by email as attachment and/or saving your orders somewhere according to the setup instructions below
- Note: Unless and until you set-up and enable any of the methods available, nothing will happen !
B) Setup – Printnode
- Choose and register for a “Printnode” account. I’d suggest you start with a free “Single Account – Lite” while you are setting things up. You can alwasy upgrade later if you need to
- Once you have completed signup, login to your printnode account and go to “Api Keys”
- Enter your password to access that page
- On the following screen enter a description and click “Create”.
- Make a note of the API Key you have just created (you will need this later)
- Go to the “Printnode Client Software download page” and download the appropriate client software for your operating system
- When the download has finished, install this software on your computer (for more info regarding installation the printnode client, follow this guide here)
- After you have finished installing the printnode client, view your connected printers (see screenshot here) and make a note of the id of the printer you want to use (“Printer ID”)
- Make sure to also select the latest Engine (“Engine6” / “Engine7″(Mac) – as of time of writing) in the printers tab of the Printnode Client as “Default printing backend”
- Go back to “WPPizza -> Order Settings -> Autoprint Orders” and enter the API Key and “Printer ID” obtained above into the relevant fields for the “Printnode” method.
- If you wish to print to more than one printer listed in your printnode client enter multiple printer id’s separated by comma.
- If you want to print multiple copies to a printer add the number of copies you wish to print following a colon (i.e enter
123456789:2which would print 2 copies123456789:3which would print 3 copies – and so on – to the printer with id 123456789. Please note: not all printers will support printing multiple copies). - If you wish to distinctly print to the same printer multiple times (to perhaps force paper cutting with a thermal printer after each print) simply enter the same printer id multiple times. (But note that this will count towards your printnode print allowances as a separate print)
- Enable the “Autoprint PDF using Printnode” checkbox
- Save
- If you have not done the general setup above, do so now, otherwise make an order on your site and get your order printed to your chosen printer
C) Setup – Email
- Go to “WPPizza -> Order Settings -> Autoprint Orders”
- Simply enter an email address in the relevant field, enable “Send order PDF as email attachment” and save
- If you have not done the general setup above, do so now, otherwise make an order on your site and get your as PDF attachment send to your chosen email address
D) Setup – FTP
- Go to “WPPizza -> Order Settings -> Autoprint Orders”
- Enable “Upload order PDF to FTP”
- Enter the FTP Hostname or IP-Address (without [s]ftp://)
- Enter your ftp username and password as indicated
- Set the portnumber (typically 21 or 22 for sftp)
- Set a subdirectoy(ies) if required (will be created if it does not exist)
- Save
E) Setup – Dropbox
- Get yourself a Dropbox account and sign in.
- Go to https://www.dropbox.com/developers/apps/create and choose your settings as in the screenshot here (you can choose any “App Name” of your liking) and click “Create App”
- In the following page, scroll down to the “OAuth 2” settings
- Set “Allow public clients (Implicit Grant & PKCE)” to “Allow”
- Set “Access token expiration” to “No Expiration”
- Click on “Generate” under “Generated access token”
- You should see a result similar to this screenshot here
- Make a note of this generated access token
- On the same page, click on the “Permissions” tab at the top.
- Ensure you have enabled the permissions (at a minimum) as in this screenshot and save (submit)
- Go back to “WPPizza -> Order Settings -> Autoprint Orders”.
- Enable the “Upload order to Dropbox” checkbox.
- Enter the “Access Token” you have generated earlier into the field for the “Dropbox” method.
- Save
- If you have not done the general setup above, do so now, otherwise make an order on your site and get your order saved as PDF in your dropbox account (under your app directory you created above)
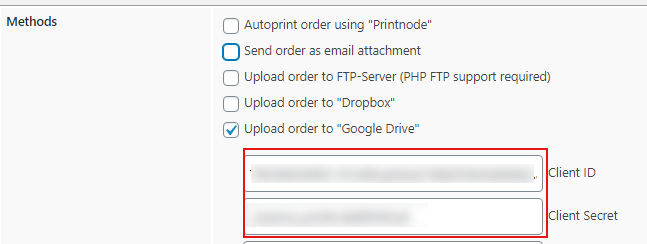
F) Setup – GoogleDrive
- Select one of your projects or create a new one according to google’s instructions and select this project if necessary when completed
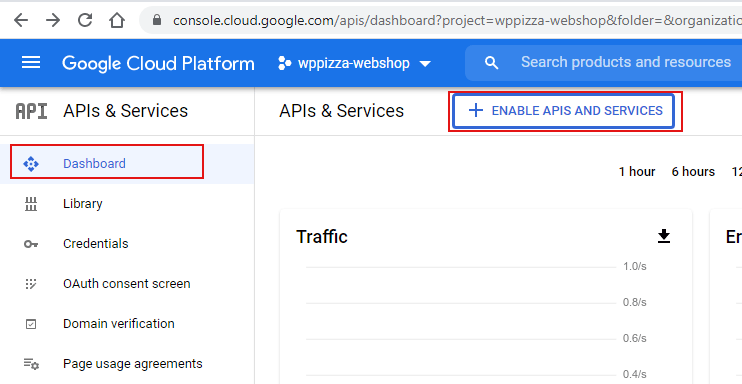
- Click enable api and services (screenshot)
- Search for “Google Drive API” and enable it if it has not been enabled yet
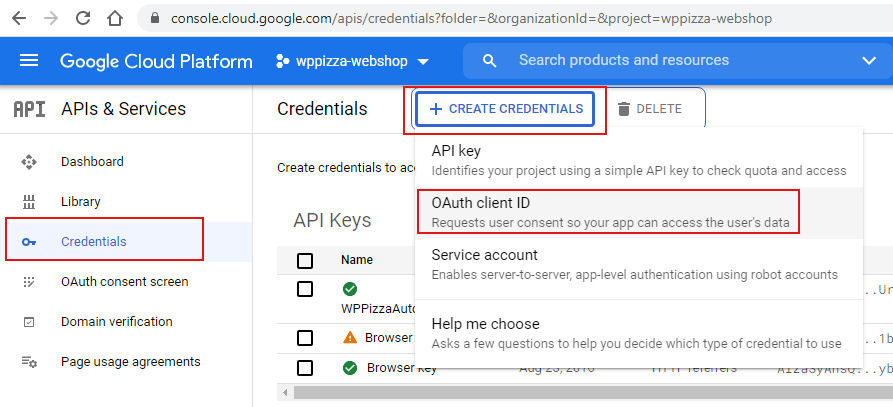
- Back on the projects main page, select “Credentials” -> “+Create Credentials” and select “OAuth Client ID” (screenshot)
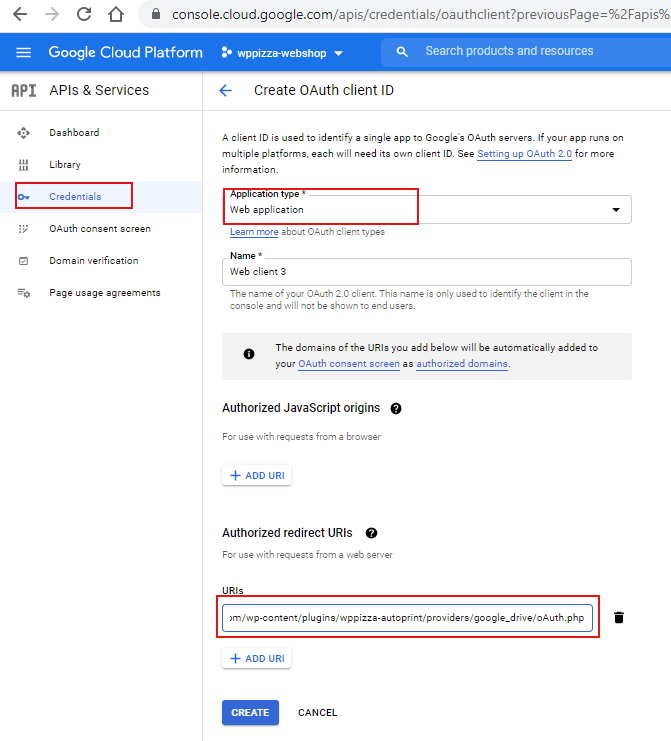
- In the following page (screenshot) select “Web Application” as Application Type, a “Name” of your liking and add “https://www.mydomain.com/wp-content/plugins/wppizza-autoprint/providers/google_drive/oAuth.php”
as “Authorized redirect URI” , replacing “https://www.mydomain.com” here as appropriate (you can find the actual redirect url you should enter here in the plugins “google drive” settings) - Click “Create”
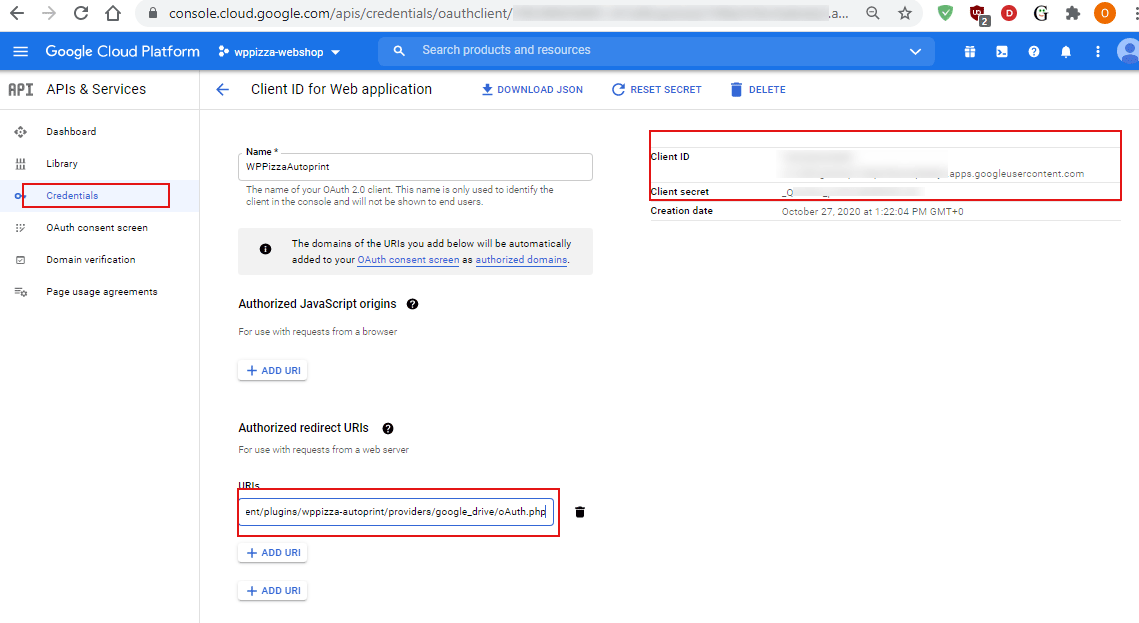
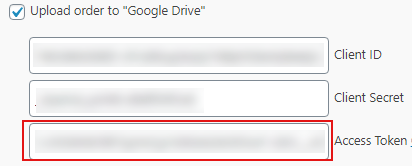
- Make a note of your “Client ID” and “Client Secret” (screenshot), and enter those in the corresponding “Client ID” and “Client Secret” fields (screenshot) in the plugins Google Drive settings
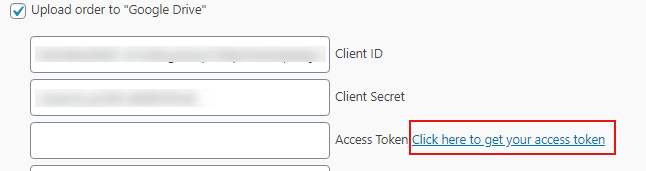
- “Save”
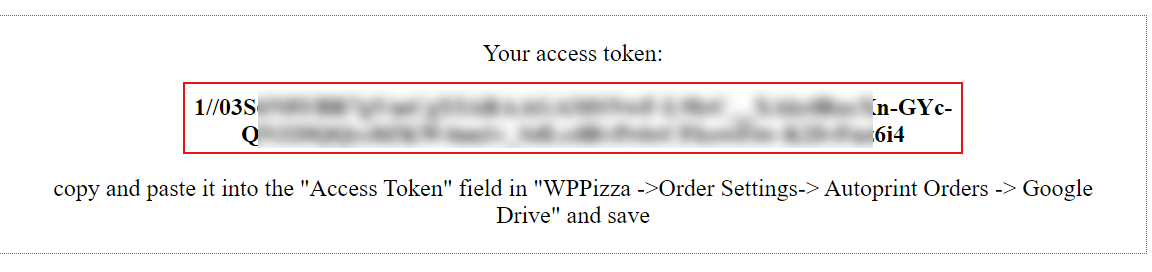
- Staying on the plugins settings page, click the link next to the “Access Token” field (screenshot)
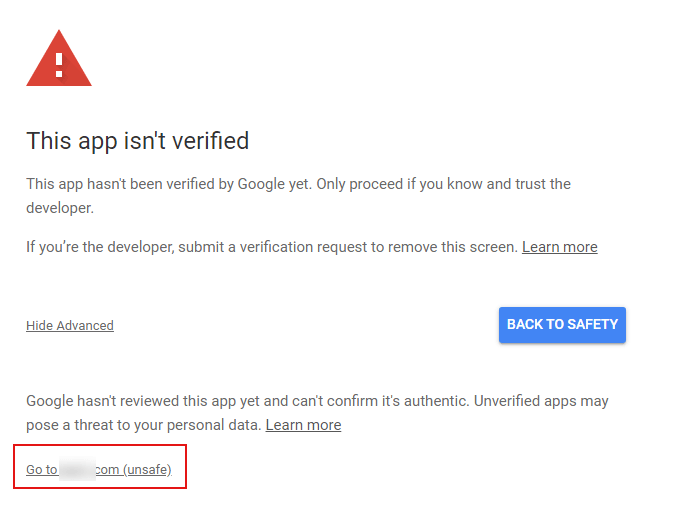
- Sign into your google account if required, click on “Advanced” in the following page that says “This app isn’t verified” and follow the link at the bottom which will say something like “Go to somedomain.com (unsafe)”
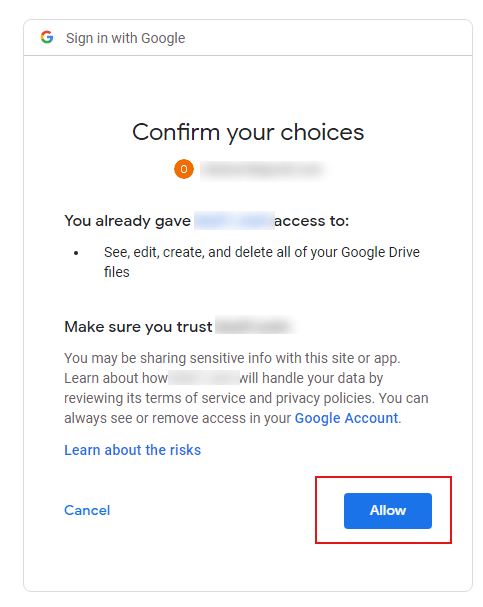
(screenshot) and click “Allow” on the resulting page. - This will redirect you back to the page on your server similar to this screenshot
- Copy and paste this access token into the “Access token” field in the plugin settings and save
Troubleshooting – General
- Enable debug like so
- Check [wp-content-path]/debug.log for relevant entries
- Also check [wp-content-path]/[plugin-path]/wppizza/logs/ for relevant logfiles
Troubleshooting – Printnode (nothing prints)
- First of all make sure you have enabled the relevant settings in the plugin itself and check the printnode log tab in your printnode client if nothing prints at all.
- Enable debug like so
- Check [wp-content-path]/debug.log for relevant entries
- Also check [wp-content-path]/[plugin-path]/wppizza/logs/ for relevant logfiles
- See also Printnode’s troubleshooting guide and FAQ’s
Troubleshooting – Printnode (print is unreadable, cutoff etc)
- Make sure you have set the correct “Page Format” for your printer ( if using a thermal printer, see also SETUP – GENERAL above)
- If it’s a very minor margin issue, try setting the “Custom Print Margins” in the plugin settings
- If it’s a major margin issue, try using a different “Custom Page Format” and/or set a distinct “Custom Printwidth”
- If the font is too small or too big, try setting a distinct “Custom fontsize in the plugin settings
- If the printout is just gibberish or big parts of it are cut off / not printed or you have way too much white space before and/or after in your printout:
-
- Make sure you have set the right “Page Format” and “Font / Character Settings” for your printer/language in the plugin settings to start off with.
- Especially for thermal printers if your print is cut off:
Make sure you allow for enough paper to start off with by going to (in Windows, other OS may vary): devices and printers, right click on the printer and printer settings, advanced, in drop-down menu change the printout from 276mm to 2760 mm for example (or whatever seems appropriate) - Enable “Send order as email attachment” with an email address you have access to to get the PDF sent to you.
- Take a photo of the actual printout from your printer
- Send the pdf you have received attached to the email as well as the photo of the printout with your printer model number, Printnode Client version to Printnode and ask them why the pdf that was being sent to your printer does not print out like the pdf (as the pdf you will have received in your email is in fact what is being sent to your printer via printnode)
- If you don’t mind, keep me informed of whatever Printnode says, so i can can make this available as an FAQ perhaps or indeed – if at all possible – address your issue in the plugin itself perhaps (Though generally it is Printnodes responsibility to print the generated PDF to the printer as intended as I have no control over that particular process)
- This section will be updated as things evolve !
Customisation
- Please refer to the documentation here if you want or need to tweak the printer output, when the default plugin options available (fontsize, margins etc) are not sufficient
Support
For support please visit the “Support Forum” or contact me via the usual channels (email, contact form)
Screenshots (admin)
General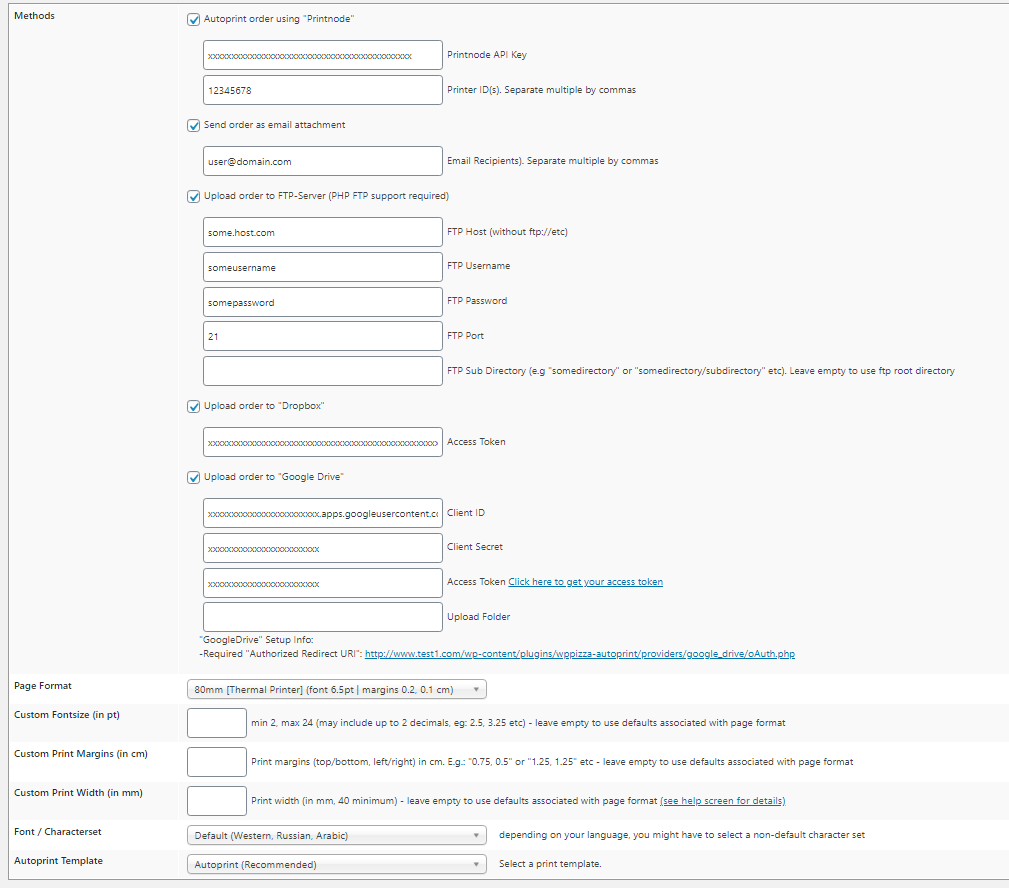
|
Page Format Options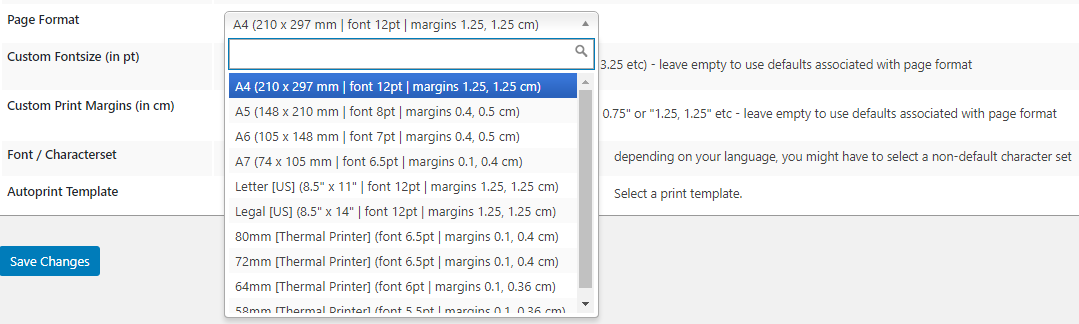
|
Charactersets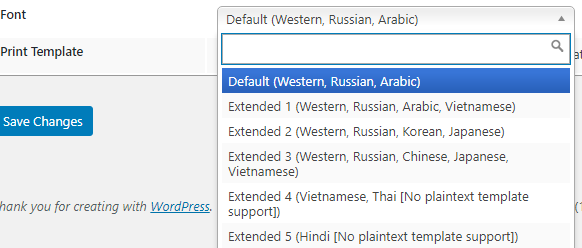
|