WPPizza – Stripe Gateway
![]()
Stripe Gateway for Integration with WPPizza.
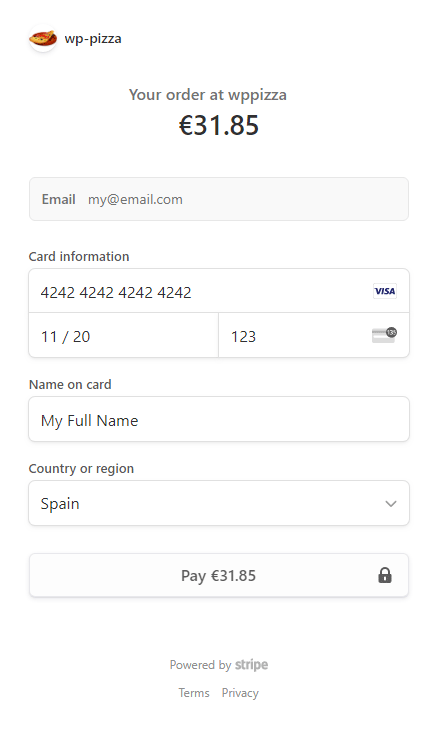
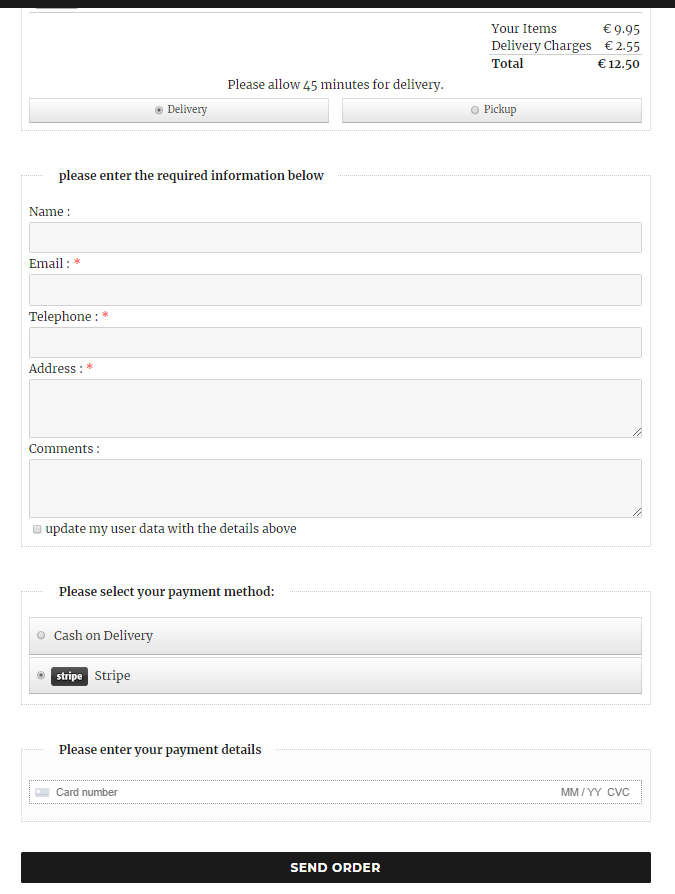
- Screenshot – client facing: using Stripe checkout (redirect/hosted payment page).
- Screenshot – client facing: using inline credit card payments.
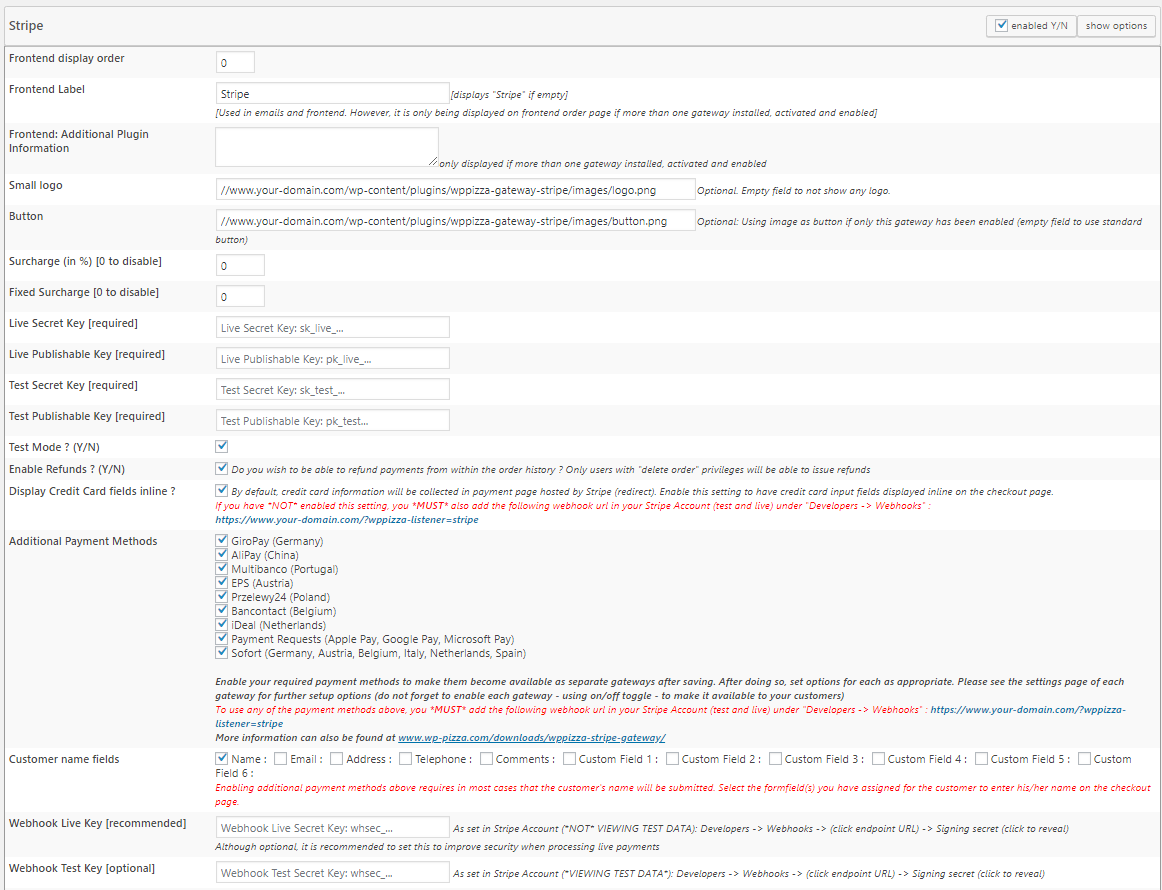
- Screenshot – administration / backend options.
- Enables simple, user friendly credit card payments using the stripe gateway
- Note: Does *not* integrate Bitcoin, iBan or any other payment method that is not specifically mentioned below under “Additional Payment Methods”.
Update 4.0+: Strong Customer Authentication (SCA)
- As of Version 4.0, SCA is automatically supported by the WPPizza Stripe Gateway implementation
- IMPORTANT: Unless you *only* want to support “Inline Card Payments” and have not done so already, you *MUST* also setup a webhook in your Stripe Account for all other payment options (See “WPPizza->Gateways->Stripe” for details)
General Requirements
- WPPizza 3.7+
- You MUST (obviously) have a Stripe account
- The currency set in WPPizza->Order Settings MUST be accepted by Stripe and be enabled in your Stripe account and by your chosen payment method
- You MUST set your Live Secret Key, Live Publishable Key, Test Secret Key and Test Publishable Key
- If you are using the default redirect implementation or wish to use any of the additional payment methods below, you MUST setup the following webhook url in your stripe account: http(s)://www.your-domain.com/?wppizza-listener=stripe (live and test mode) replacing “http(s)://www.your-domain.com” as appropriate for your site
- Set this Webhook Endpoint URL to “Events to send -> receive all events” or – at a minimum – to
“source.chargeable”, “source.failed”, “source.cancelled”, “charge.succeeded”, “charge.refunded” and “payment_intent.payment_failed”
Be aware that if you do NOT set it to send all events, you will have to manually add any events that may be added to the gateway implementation in the future
- At least the WPPizza order page MUST be SSL encrypted (Stripe requirement) . Note: to enable SSL encryption you will need to acquire a security certificate for your site from a security certificate provider at possibly extra costs to you
- PHP >5.4+ with cUrl, json and mbstring extensions installed (that’s usually the case by default) is required by Stripe
General Setup
- Install by uploading the zip file in the normal wordpress manner from withing the plugin screen (add new->upload) and activate
- Obtain your secret and publishable Api keys from within your Stripe account as outlined below.
- In your wordpress installation , go to WPPizza->gateways and click on “Show Options” for thr Stripe gateway.
- Enter your test and live secret and publishable Api keys (switch between test and live using the “Test Mode ? (Y/N)” checkbox) in the corresponding fields.
- Set all other options as required
- Save
- Make sure you have set the webhooks and associated events in your Stripe account as outlined above if any of your enabled payment method requires it.
For clarity: the *only* setup where you would *not* have to set the wehook and events in your Stripe account is if you have enabled “Inline – Credit Cards Only”
Create and obtain Stripe Api keys
As of 30 June 2024 Stripe requires the use of restricted secret keys alongside the public key to access the Stripe API.
If you use the old secret key, you must change this in the “WPPizza Stripe Gateway” plugin settings to a restricted key.
This applies to test/sandbox settings as well as live/production settings.
You can generate secret restricted keys by either using the “WPPizza – ApiKeys” App available from the Stripe marketplace or manually. Both options are outlined below.
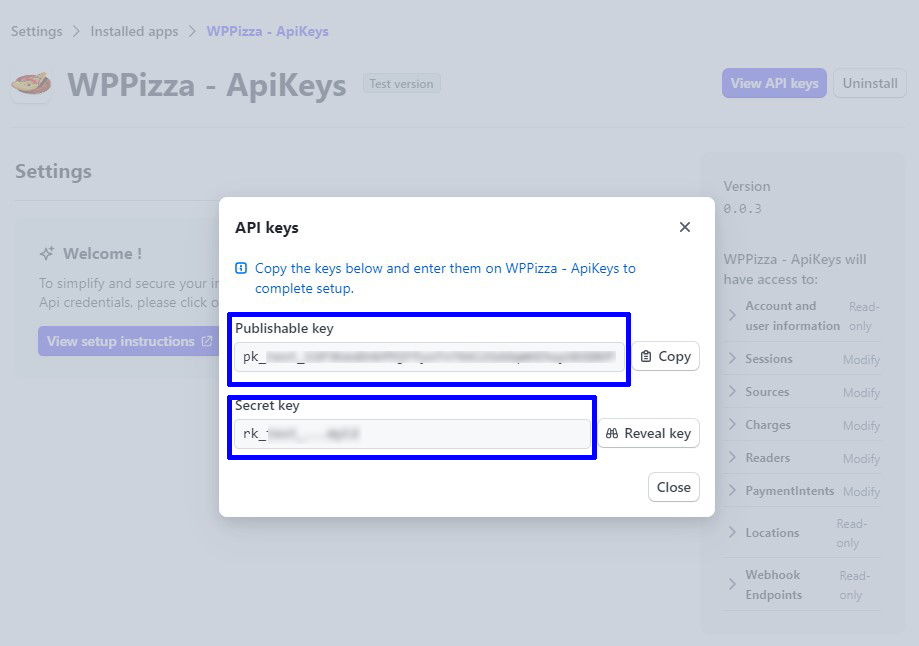
Generating and obtaining Api keys using Stripe WPPizza – ApiKeys App
- 1) Sign in to your Stripe account at https://manage.stripe.com
- 2) Install the “WPPizza” App from the Stripe marketplace by going to https://marketplace.stripe.com/apps/install/link/com.apikeys.wp-pizza or https://marketplace.stripe.com/apps/wppizza following the on-screen instructions.
- 3) Once installed, click on “View ApiKeys” (Screenshot) and make a note of your publishable and secret key (Screenshot).
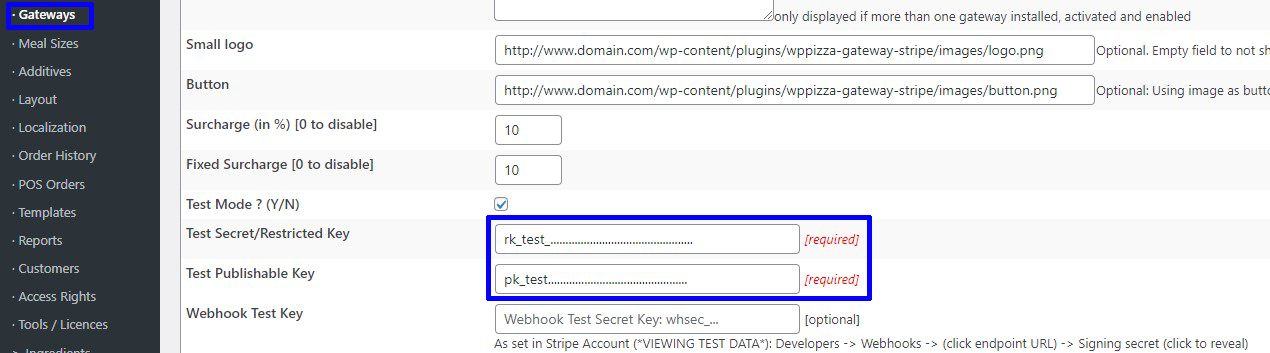
- 4) Copy the “Publishable key” and “Secret Key” into the corresponding fields in the “WPPizza Stripe Gateway” settings in your wordpress installation under “WPPizza->Gateways : Stripe” (Screenshot) and save.
- Switch from “Test mode” to “Live mode” (Screenshot) or vice versa depending on which mode you started with and repeat steps 2 to 4.
- Make sure that you have also set and enabled your webhooks if required (See “General Requirements” above)
Generating and obtaining Api keys manually – Test Keys
- 1) login to your Stripe account at https://manage.stripe.com
- 2) check you are in “Test mode” (switch top right | Screenshot)
- 3) click on “developers” (link at the top of the page | https://dashboard.stripe.com/developers | Screenshot)
- 4) click on “API keys” (link under “Developers” | https://dashboard.stripe.com/apikeys | Screenshot)
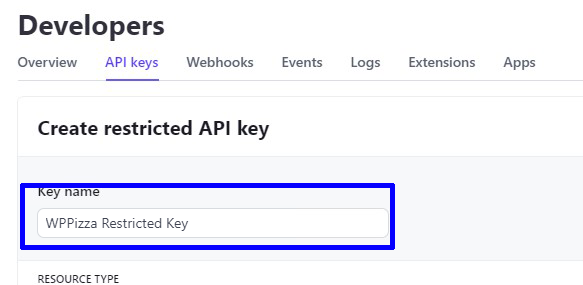
- 5) click on “Create restricted key” (button on the upper right of your screen | Screenshot)
- 6) enter a “Key name” (perhaps something like “WPPizza Restricted Key” so you know what it is for, but the name can be set to whatever you wish | Screenshot) and set the following permissions in the column under “Permissions” (Screenshot):
- Section – All core resources:
- Charges: Write
- PaymentIntents: Write
- Sources: Write
- Tokens: write
- Section – All Checkout resources:
- Checkout Sessions: write
- Section – All webhook resources:
- Webhook Endpoints: read
- Section – All Terminal resources:
- Locations: read
- Readers: write
Leave all others at “None”, click “Create Key”
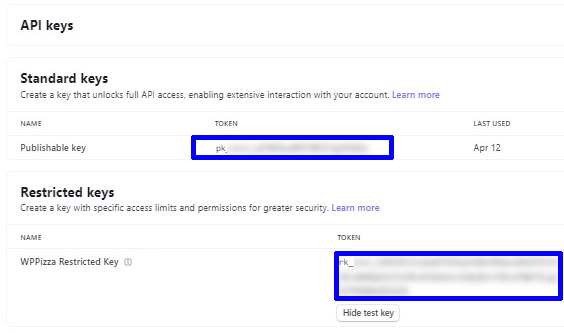
- 7) Make a note of your “Publishable key” (starting with ‘pk_test_’) and your newly created restricted key (starting with ‘rk_test_’) | Screenshot
- 8) Enter those Keys into the corresponding fields in the “WPPizza Stripe Gateway” settings in your wordpress installation under “WPPizza->Gateways : Stripe” | Screenshot
- Make sure that you have also set and enabled your webhooks if required (See “General Requirements” above)
Generating and obtaining Api keys manually – Live / Production Keys
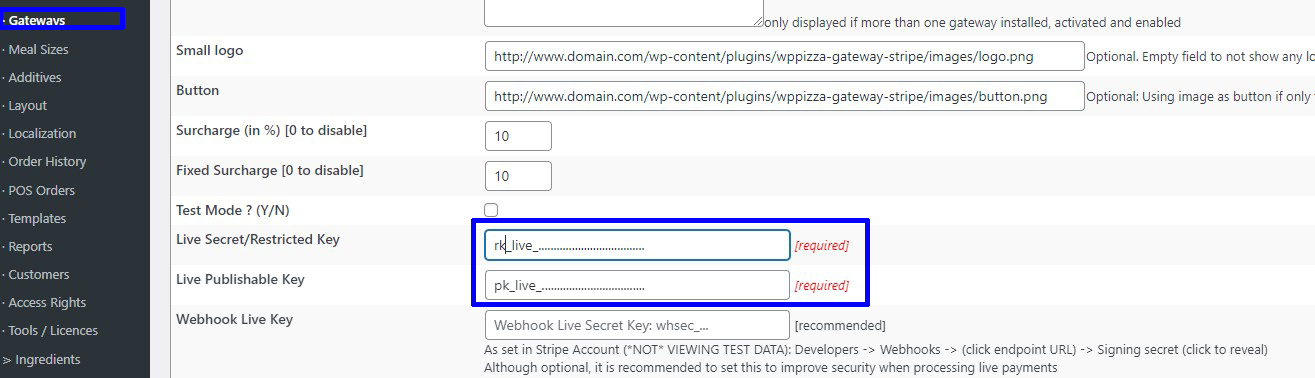
- 1) Switch from “Test mode” into “Production mode” (i.e disable “Test mode” | Screenshot)
- 2) Follow steps 3 to 6 above
- 3) Make a note of your “Publishable key” (starting with ‘pk_live_’) and your newly created restricted key (starting with ‘rk_live_’)
- 4) Enter those Keys into the corresponding fields in the “WPPizza Stripe Gateway” settings in your wordpress installation under “WPPizza->Gateways : Stripe” | Screenshot
- Make sure that you have also set and enabled your webhooks if required (See “General Requirements” above)
Additional Payment Methods – Requires WPPizza v3.7+ as well as the general requirements specified above
Please refer to payment method fact sheets for full details/requirements/currency and geographical acceptance for each payment method
- Affirm (***) – US, Canada
- Afterpay / Clearpay – US, Canada, Europe, Asia (USD, CAD, GBP, AUD, NZD, or EUR)
- AliPay – China
- Bacs Direct Debit (*) – UK (GBP)
- Bancontact – Belgium
- Blik (***) – Europe
- Boleto (*, ***) – Latin America
- EPS – Austria
- FPX (***) – Asia
- GiroPay – Germany
- GrabPay (***) – Singapore, Malaysia
- Ideal – Netherlands
- Klarna – US, Canada, Europe
- Konbini (*, ***) – Asia
- Oxxo (*, ***) – Latin America
- PayNow (***) – Asia
- Payment Requests (**, ****) – (ApplePay, GooglePay, Link etc) – Global
- Pix (***) – Latin America (Brasil)
- Prompt Pay (***) – Asia (Thailand)
- Przelewy24 – Poland
- Sepa Direct Debit (*) – Europe (EUR)
- Sofort – Germany, Austria, Belgium, Italy, Netherlands, Spain
- WeChat Pay (***) – China
- Notes*: Delayed Payment Confirmations. It may take minutes, hours or even days for payments to be processed and confirmed. If you enable this kind of payment method ensure this is acceptable for your business purposes.
- Notes**: Country selection required. If you enable this kind of payment method, you must also set a country below.
- Notes***: Beta / Untested. Due to country and currency restrictions, it was not possible to completely test these payment methods and their payment flow. If these payment methods are appropriate for your business please get in contact if you have any issues (or indeed if you can confirm they work as intended). Thank you.
- Notes****: If you have enabled ApplePay in your Stripe account, it must be the first gateway option displayed as per Apple’s T&C’s
Setup – Using Additional Payment Methods: Prerequisites/Requirements
- You *MUST* setup the following webhook url in your stripe account: http(s)://www.your-domain.com/?wppizza-listener=stripe (live and test mode) replacing “http(s)://www.your-domain.com” as appropriate for your site
- If you wish to support Payment Requests (Apply Pay, Google Pay, Microsoft Pay), your pages must always be SSL encrypted (https) and not have any mixed (i.e non-ssl) content. This applies to both, live and test payments. Before testing these integration on your site, please ensure the device you are testing with supports these kind of payment requests by checking it here (you should see a “Pay now” button)
- If you wish to support Apply Pay, you must also register your domain with apple pay as described here. (Summary: download and copy association file to your server, register your domain in your stripe dashboard )
- For added security it is highly recommended that you also enter your Webhook Live/Test Keys as set in your Stripe Account (Test /Live) : Developers -> Webhooks -> (click endpoint URL) -> Signing secret (click to reveal)
- Make sure any additional payment method you enable is accepted in your country and for your currency set in your WPPizza settings. If in doubt, please contact Stripe for clarification
Setup – Enabling Additional Payment Methods: only applicable for “Integration Type : Inline – Payment Widget Custom”
- Enable any of the “Additional Payment Methods” you want to offer and are available for your country/currency
- Enable the appropriate “Customer name fields” to indicate which fields on your order page are used to capture a customer’s name
- Once you save the settings/page, you will find additional settings for each additional payment method you have enabled
- Check the settings for each of those payment methods (especially “Sofort” and “Payment Requests” settings if used), enable and save
Setup – Enabling Additional Payment Methods: only applicable for “Integration Type : Redirect – Payment Widget Custom”
- Enable any of the “Additional Payment Methods” you want to offer and are available for your country/currency
- Enable the appropriate “Customer name fields” to indicate which fields on your order page are used to capture a customer’s name
- Enable the payment methods you want to offer your customer when being redirected to Stripe’s hosted payment page and save. (Make sure the selected payment methods have been enabled in yoru Stripe account tto begin with)
Troubleshooting
- If you still have problems enable standard debug (see https://docs.wp-pizza.com/troubleshooting/) , check the logfiles in wppizza/logs and contact me at : dev[at]wp-pizza.com with the domain you are having problems with. Please attach all your logfiles (if any) that reside in the wppizza/logs directory as well as any debug.log in your wp-content directory
- Please note: when changing your payment method integration in the administration panel (WPPizza->Gateways->Stripe) you will probably have to clear your browser cache and cookies (you should try this first if you receive a “Stripe Error[E0002]: ……..” on your checkout page)
Screenshots – Payment By Credit Card
(click images for larger versions)
|
Frontend (redirect) |
Frontend (inline)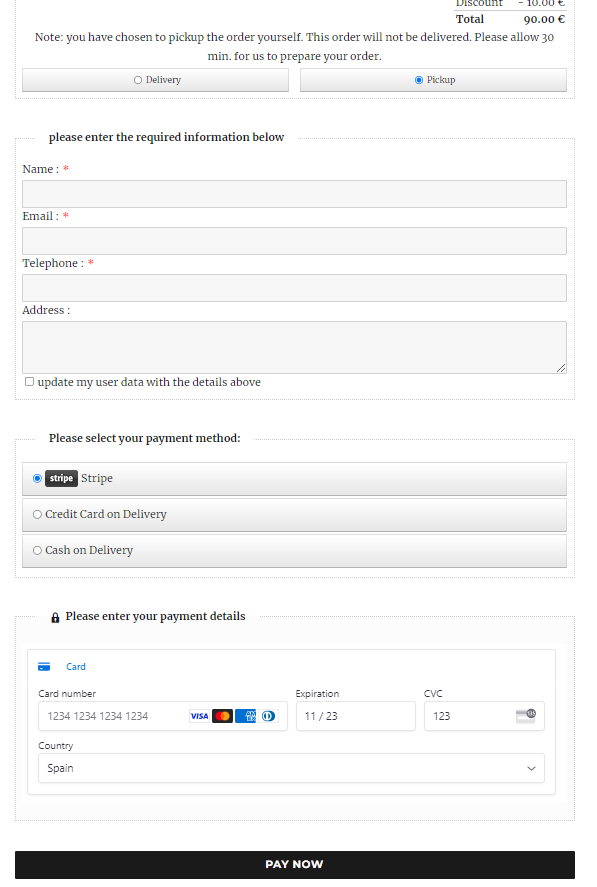
|
Frontend (Widget)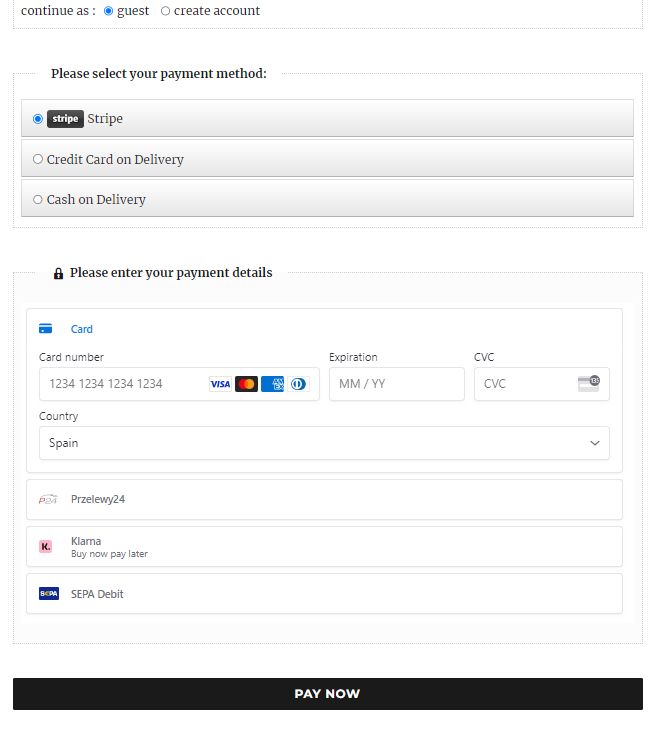
|
Admin panel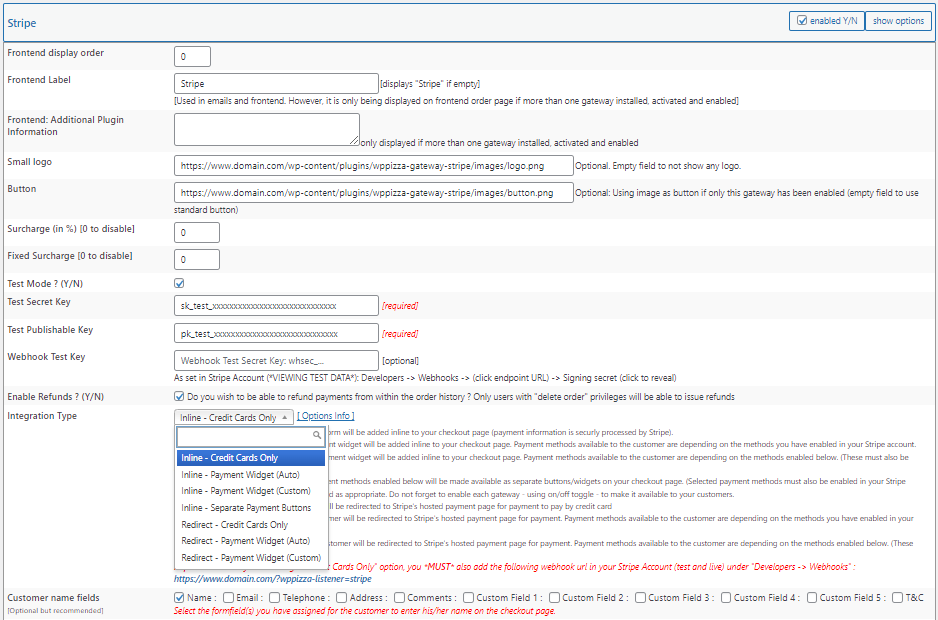
|