WPPizza – Confirm|Reject|Notify
Description – (see also screenshots below)
An extension for WPPizza that allows to
Require Confirmation of an Order:
- require a user to confirm his/her order for any payments that are to be made on delivery or pickup (i.e any orders that are not already prepaid by credit card or similar)
- confirmation requests will be send by email – containing a confirmation link or – optionally – by SMS utilising a SMS gateway (additional SMS gateway charges will apply, see notes below)
- currently supported SMS gateways: tm4b.com, clickatell.com, twilio.com, plivo.com
- confirmation links can be set to be valid from between 5 to 120 minutes
-
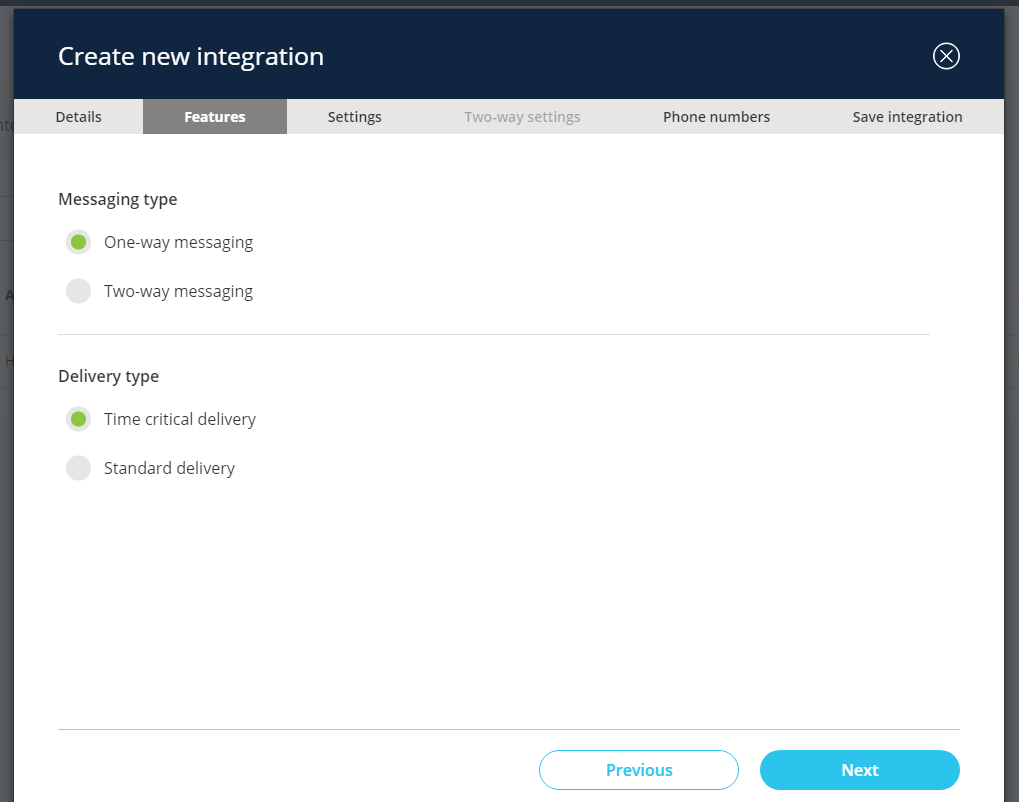
Available confirmation request messages sending options:
- By Email: sends an email to the customer containing a link that needs to be followed to confirm an order.
- By SMS “1-Way”: send a text message containing a link that needs to be followed to confirm an order
- By SMS “2-Way”: send a text message containing a 6-digit code that confirms an order if the message is being replied to with this code. Can optionally contain an alternative link that can be followed to confirm an order.
- By SMS “3-Way”: Same as “2-Way” but will also reply by text message back to the user when an order has been confirmed.
- When using “By SMS” you can choose to also send an email alongside the SMS. Emails will always be sent as fallback if sending of an SMS message fails
Important notes regarding SMS messaging:
– Your chosen SMS gateway will charge for SMS communications (typically per message or per x-number of messages).
– Ensure the SMS gateway you choose supports your country – (only messages to/from numbers of one country of your choosing are supported)
– For 2/3-way communications, a virtual number must typically also be purchased from your chosen SMS gateway provider (i.e additional costs may apply)
– Assuming that your country is supported in the first place, “2-Way”/”3-Way” communication might not be. Please contact your chosen SMS gateway for clarification
– If SMS messages fail for one reason or another an email will automatically be sent as fallback. Any errors generated can be found in the main wppizza plugins /log directory
Reject an Order:
- allow a not yet paid order to be rejected by clicking on a button in the order history
- on rejection, a predefined – but individually customisable – email can be sent to the customer (SMS messaging is not supported for Order Rejections)
- if your payment gateway supports refunds, even already paid orders can be rejected and a refund will automatically be given
Customer notifications on order status update:
- send a – predefined but editable – email and/or SMS (“1-Way”) to the customer when the order status changes to any of the processed/delivered/on hold/acknowledged status in wppizza->order history
- option to allow those messages to be sent without prompting (but care should be taken that the auto-sent email will be suitable in all circumstances)
Admin notifications on order status update:
- automatically send an email and/or SMS (“1-Way”) and/or Pushover notification to an administrator when the order status changes to any of the processed/delivered/on hold/acknowledged status in wppizza->order history
Admin notifications when a new order has been received:
- automatically send an email and/or SMS and/or Pushover and/or WhatsApp notification to an administrator when a new order has been receivedy
Push new order and/or order status update notifications to your iOS/Android phone or desktop:
Uses https://pushover.net/ (additional charges apply) to send push notification when a new order has been made
- Send a – predefined but editable – notification message to your https://pushover.net/ iOS/Android phone or Desktop App
- Note: you will need to download and install one of the device clients available (https://pushover.net/clients)
- There is a 7-day free trial available. Usage beyond the 7-day trial requires a one-time $4.99 in-app purchase.
- There is also a limit of 7000 notifications per month (this would equate to about 230 orders/per day) – though more can be purchased
- Above prices and limitations as of May 2020 to the best of my knowledge, without warranty and may be changed by pushover.net without notice – please refer to their T&C’s for exact details
Requirements
- WPPIZZA 3.3.4+, Wordress 4.0+, PHP 5.5+ (7.1 recommended for WhatsApp messaging), cUrl
Installation
- install by uploading the zip file in the normal wordpress manner from withing the plugin screen and activate
- in your admin go to WPPizza->C,R,N (short for Confirm, Reject, Notify) to set options as required
General Setup
Order Confirmations
-
Select the type of order confirmation you would like (“Email”, “SMS” (1, 2 or 3-way) or simply “Disable” to turn this functionality off):
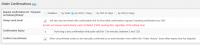
- Set the expiry time – in minutes (max 120) during which an order must be confirmed by the customer. (Defaults to 15 minutes)
- If using SMS, decide if you always want to send emails too.
- If you would like to be able to confirm an unconfirmed order (even after a confirmation link has expired) by using a button in the order history, enable “Confirm Unconfirmed” (you can enable or disable this at any time)

- Set/edit the relevant email/SMS contents as required in the “localization” tab of the plug (refer to the “help” screen – available from the top right – for available template parameters)
- For frontend examples refer to the screenshots below
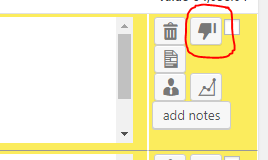
Reject Order
-
Enable to allow orders to be rejected with an email message to the customer (Note: SMS messaging is not supported for rejection messages)

-
Where appropriate, a button (thumbs-down) will appear in your “Order History” that lets you reject an order that has not been pre-paid

- If your payment gateway supports refunds, even already paid orders can be rejected and refunds will automatically be given
- Set/edit the relevant email contents as required in the “localization” tab of the plug (refer to the “help” screen – available from the top right – for available template parameters)
- For resulting rejection notification examples, refer to the screenshots below
Notifications
- Choose the kind of notifications you would like to send (“Email”, “SMS”, “Both” or “Disabled” to disable this functionality)

- Enable one more of the available “status changes” to prompt you for a message to be sent when the order status is being changed to this status. (Not enabling any status here would have the same result as disabling notifications completely)
- If you wish, notifications can be automatically send without prompting by enabling “auto notifications”. (Before enabling this, I would suggest you send notifications manually for a while until you are certain “auto notifications” will apply to all circumstances)
- Set/edit the relevant email contents as required in the “localization” tab of the plug (refer to the “help” screen – available from the top right – for available template parameters)
- For resulting notification examples, please refer to the screenshots below
Note: if any of the “Order Confirmations”, “Reject Order” or “Notifications” options are enabled the email form field in” WPPizza->Order Formfields” will always automatically be added to the checkout form and will always be required to be filled in on all orders
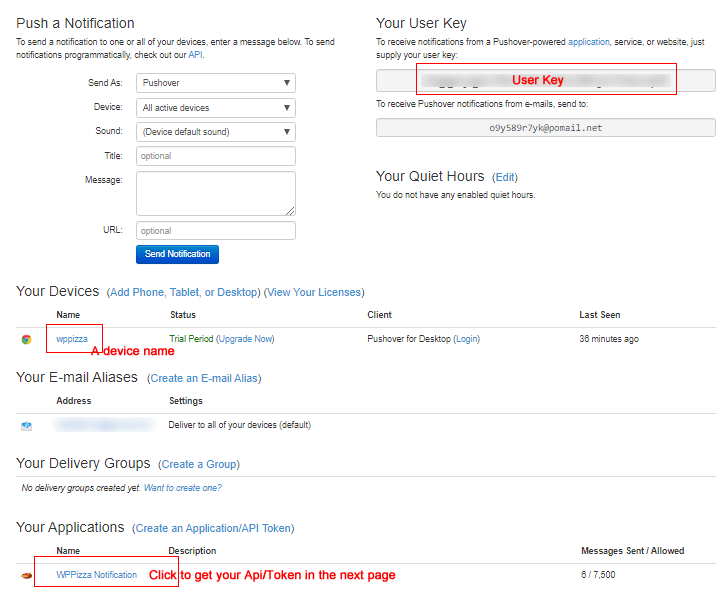
Pushover Notifications – Settings
- Register an account at https://pushover.net/ and log in. Make sure you understand the T&C’s and Pricing (Typically the “Individual Pricing” will apply)
- Make a note of the “User Key” (*not* the email) displayed (you’ll need this later).
- Click on “Create an Application/API Token”
- Enter a “Name” (WPPizza for example) and optionally choose a Description, Url and Icon. Agree to the T&C’s and click “Create Application”.
- In the resulting page, make a note of the “API Token/Key” that was generated (you’ll need this later).
- Download one of the clients for your preferred device, install and set the options as you wish
- Back in the plugin settings page – “WPPizza -> C,R,N -> Settings” – go to “Pushover Settings ” and enter your “User Key” and “API Token/Key” and save.
- Go to “WPPizza -> C,R,N -> Localization” to adjust your subject line and message as required and save
- Enable “Pushover” for your “Admin Notifications (Status Change)” and/or “Admin Notifications (New Orders)” and respectively the desired devices as required
- You will now receive notifications on your chosen device(s)
- To get your Tokens/Keys/Names at a later date, see the following screenshot

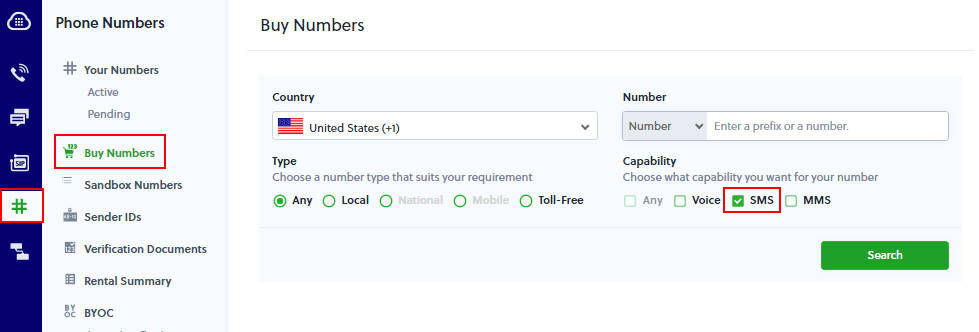
SMS Settings – Admin/Customer order confirmations and notifications
If you select to use any SMS option in the Customer or Admin notifications you must have an account with one of the following SMS gateway providers and set the relevant options as outlined below
Twilio
- to use Twilio to send SMS messages you must first get an account at twilio.com.
-
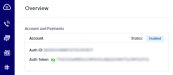
Log in to your account and make a note of your account id and account token (you will need this further down)
-
using 2 or 3-Way Confirmation Request SMS
-
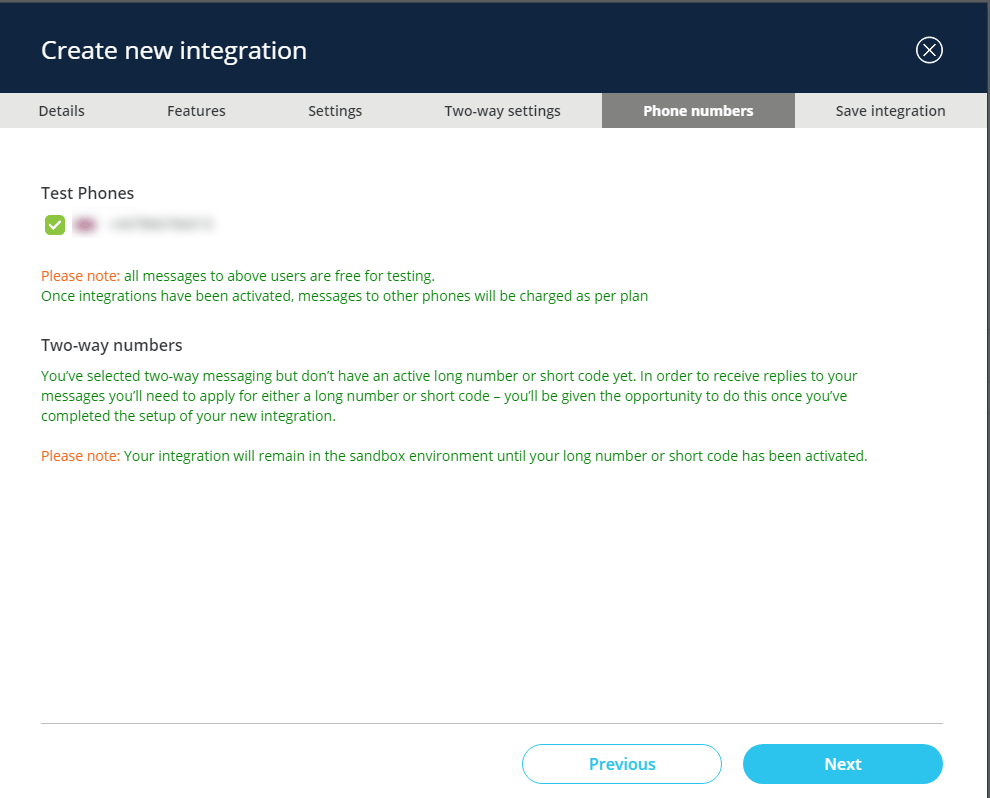
if you want to use the “2-Way” or “3-Way” SMS option as order confirmations, you must purchase a virtual number with SMS capabilities
-
make a note of that virtual number
-
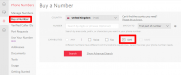
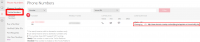
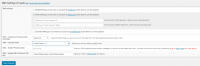
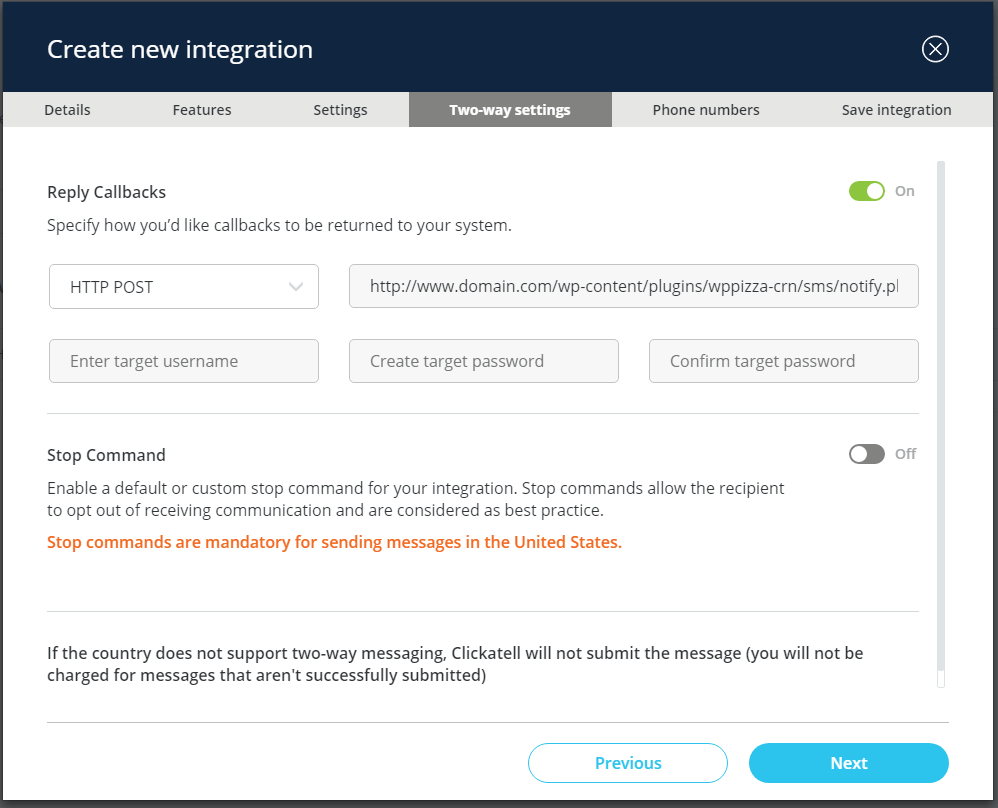
go to “Active Number” (make sure it has SMS capabilities) and enter “http://www.domain.com/wp-content/plugins/wppizza-crn/sms/notify.php” as url, replacing “http://www.domain.com” with your domain in the “Messaging->A message comes in” section and using “Webhook” and “HTTPPOST” from the dropdowns

-
if you want to use the “2-Way” or “3-Way” SMS option as order confirmations, you must purchase a virtual number with SMS capabilities
-
Back in the plugin options, enter your twilio account id and account token.
- select your country’s phone/dialling prefix from the dropdown
- enter an outgoing SMS number without country code or leading zeros. this should be your virtual number from above if you are using 2 or 3-Way messaging
- optionally enter your google API shortener Key (further info regarding this can be found in the plugins help screens )
- Save


Note: at time of writing , you can test SMS integrations if you verify your personal SMS capable phonenumber and enter it in the “SMS – Sender Country Prefix/Phonenumber” and subsequently too in the “phonenumber” input field on the checkout page (for more details please refer to their documentation)
Plivo
- to use Plivoto send SMS messages you must first get an account at plivo.com.
-
Log in to your account and make a note of your “AUTH ID” and “AUTH TOKEN”
-
using 2 or 3-Way Confirmation Request SMS
-
if you want to use the “2-Way” or “3-Way” SMS option as order confirmations, you must purchase a virtual number with SMS capabilities
-
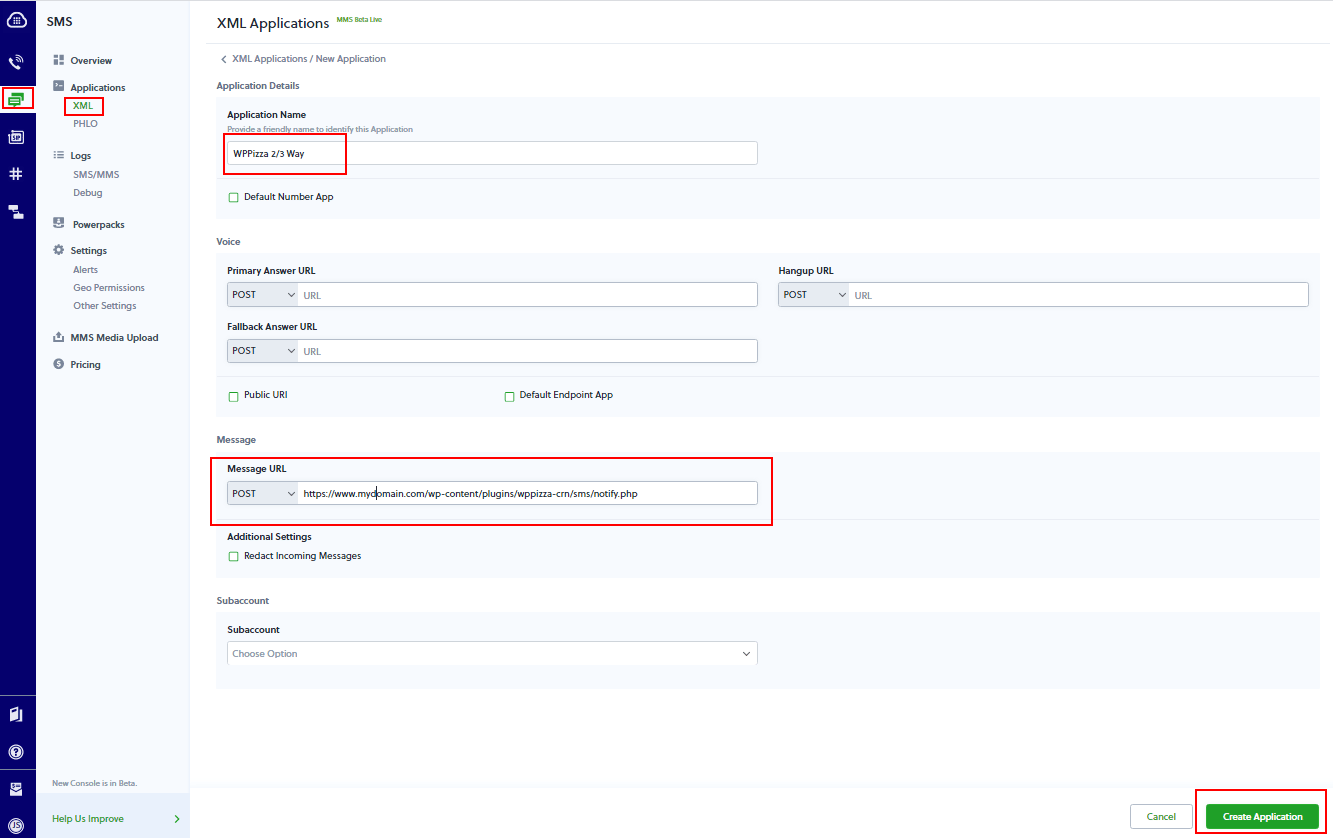
Once you have purchased this number, go to “Applications” and create a new XML Application entering your desired application name and entering https://www.mydomain.com/wp-content/plugins/wppizza-crn/sms/notify.php as POST Message URL replacing “www.mydomain.com” with the domain of your server and click “Create Application”.
-
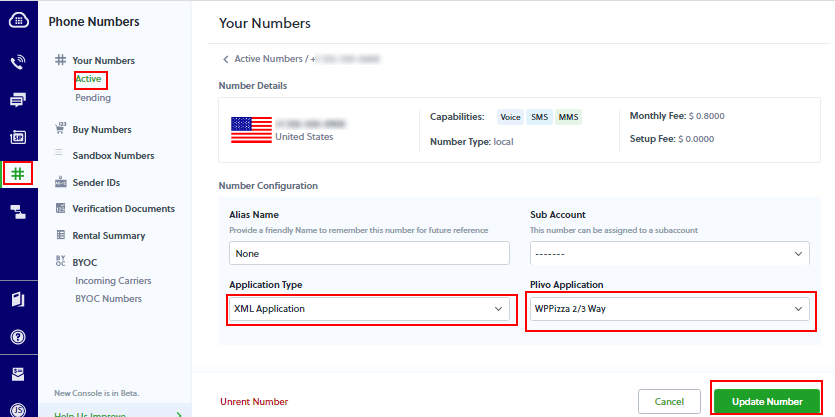
Go back to your active phone numbers select the phonenumber you purchased earlier and associate it with the Plivo XML application we created in the previous step.
-
if you want to use the “2-Way” or “3-Way” SMS option as order confirmations, you must purchase a virtual number with SMS capabilities
-
Back in the plugin options, select Plivo from the SMS settings options, enter your Plivo “AUTH ID” and “AUTH TOKEN”. Select the formfield you use on your checkout page for customers to enter their phone number into. Select your country prefix. Enter an SMS enabled phonenumber (if you have purchased a virtual phonenumber from Plivo, enter this one here).

- Save


Note: at time of writing , you can test 1-Way SMS integrations if you verify your personal SMS capable phonenumber and enter it in the “Phonenumber” input field on the checkout page However, as Plivo does not accept an SMS being sent when the sending and receiving phonenumber is identical the plugin will automatically change the sender ID to “SMSMSG” to get around this restriction and make sure the message gets sent regardless
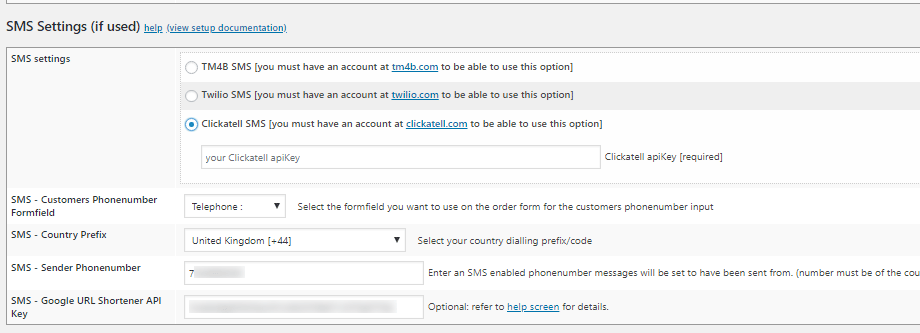
Clickatell
- to use Clickatell to send SMS messages you must first get an account at clickatell.com.
-
login to your clickatell acount and
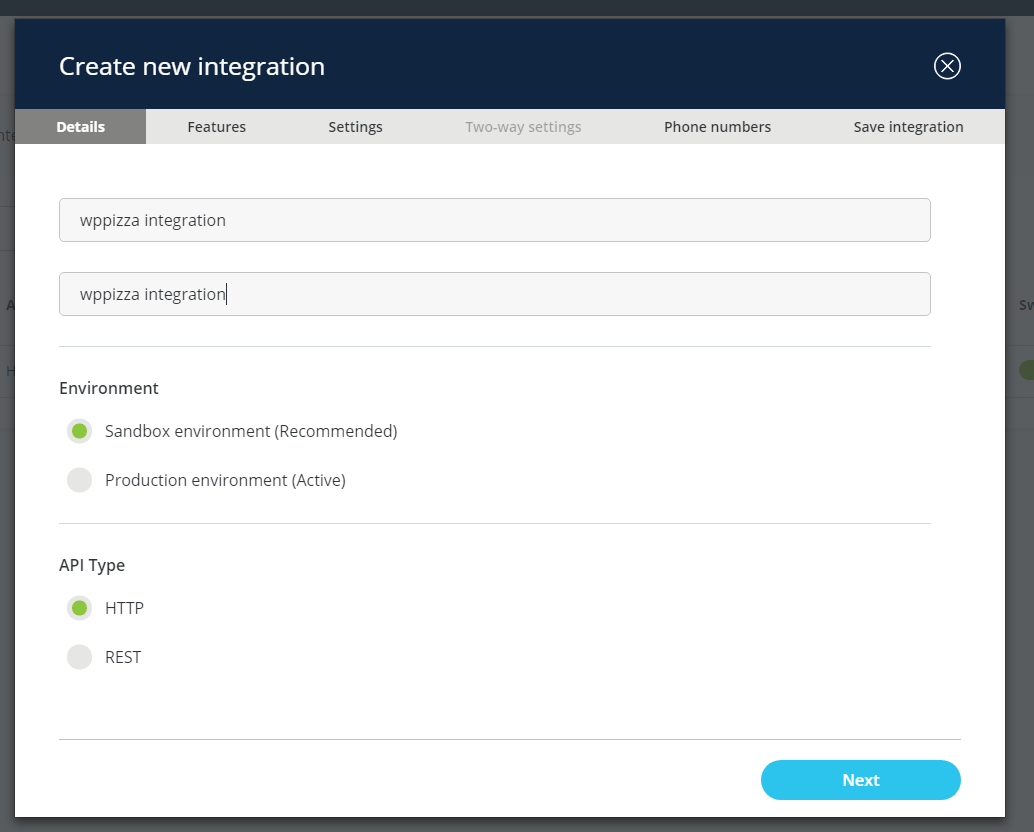
a) create an integration

-
b) enter a name you would like to use , select the appropriate environment, and set API type to “HTTP”

-
c) select “One-way” for one way messaging or “Two-way” if you have enabled “2-way” or “3-way” in the plugins “Confirmation request” options (you will need to purchase a virtual number from clickatell if you want to utilise “Two-way” )

-
d) if using “Two-way” set the “Reply Callback” to be HTTP POST and enter “http://www.domain.com/wp-content/plugins/wppizza-crn/sms/notify.php” as url, replacing “http://www.domain.com” with your domain. you can leave the rest blank here

-
e) in the next screen make a note of your phonenumber (this may look different depending on your test/live one-way or two-way integration selected)

-
Back in the plugin options, enter your clickatell api key
- select your country’s phone/dialling prefix from the dropdown
- enter the outgoing SMS number you have set up in your integration without country code or leading zeros. (If you are using 2 or 3-Way messaging options in the in the “SMS – Sender Country Prefix/Phonenumber” you must have purchased a virtual number from clickatell)
- optionally enter your google API shortener Key (further info regarding this can be found in the plugins help screens )
- Save
f) save your integration and make a note of the api key generated
![]()
WhatsApp Settings – Admin new order notifications
If you select to use the WhatsApp option in the new order admin notifications you must have an account with one of the following gateway providers and set the relevant options. Naturally, you will also need a WhatsApp enabled device to receive your WhatsApp messages on
- Twilio
- Green Api
- Textmebot
- Fonnte
Support
for support please visit the “Support Forum”
Screenshots
|
Admin – settings options |
Admin – Localization |
|
Frontend – Unconfirmed: eMail 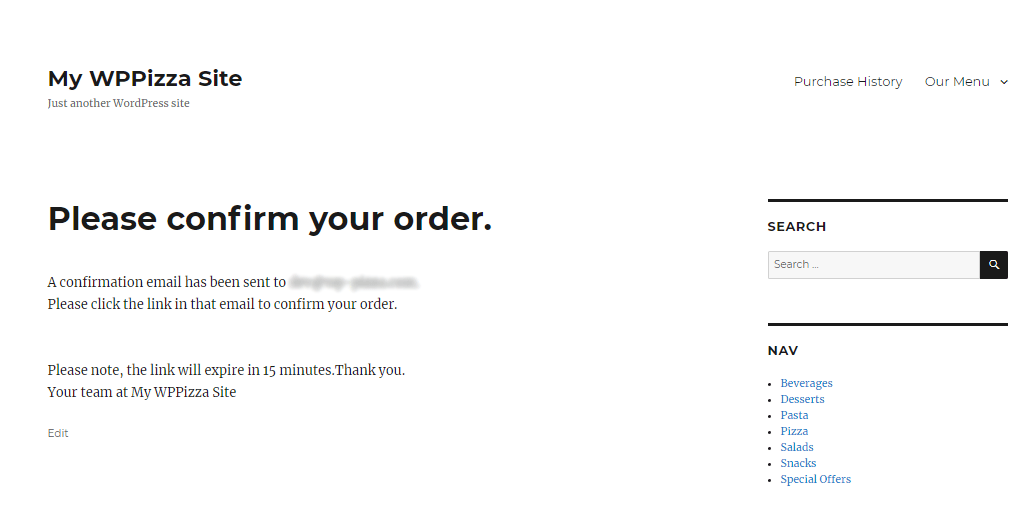
|
Frontend – Unconfirmed: SMS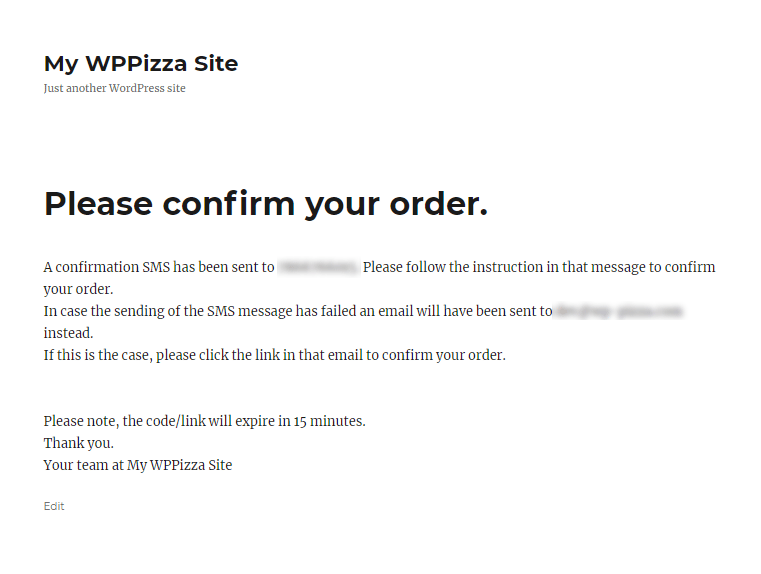
|
Unconfirmed eMail received- 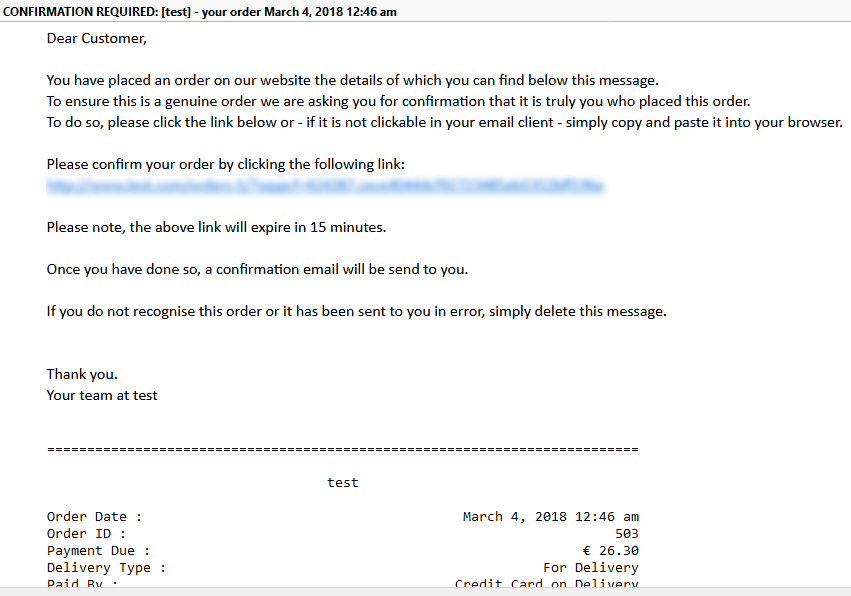
|
SMS Confirm One Way (with url shortened)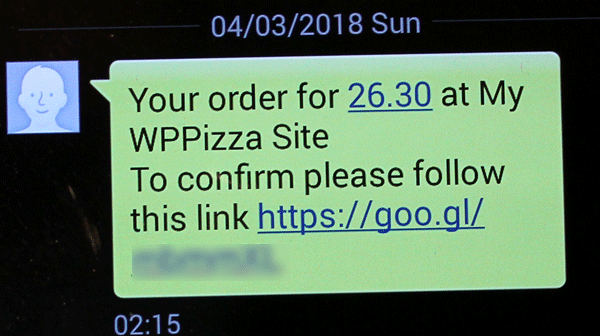
|
SMS Confirm Two/ThreeWay (with url shortened)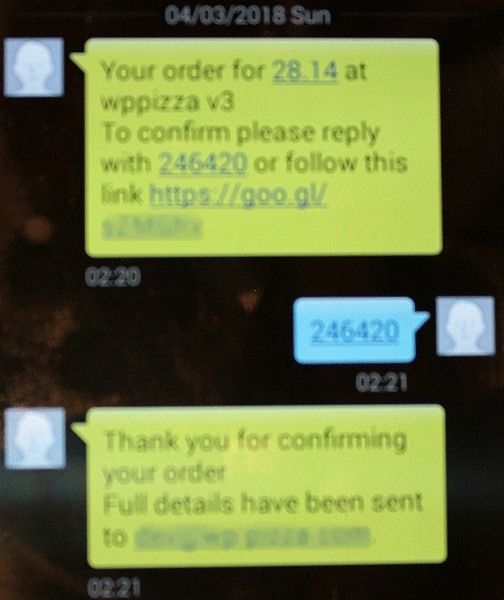
|
Admin: Unconfirmed in Order history
|
Reject Order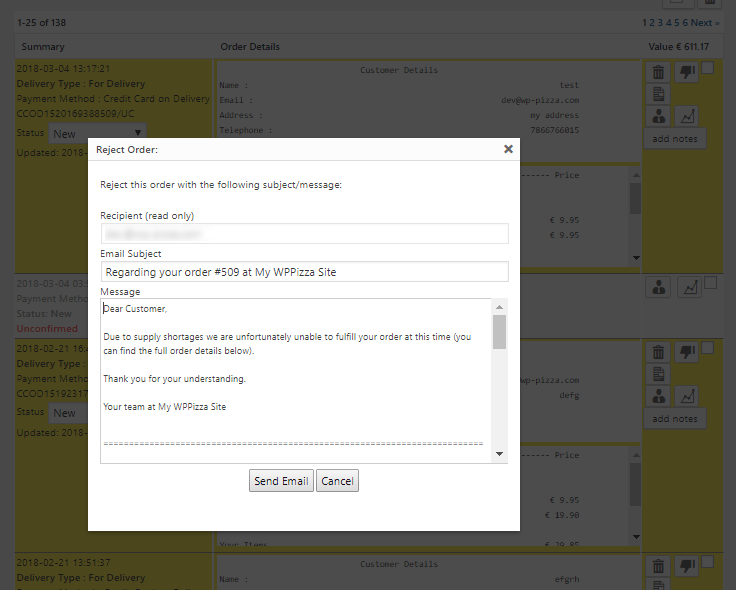
|
Notify Processed Order 
|
Pushover “New Order” notifications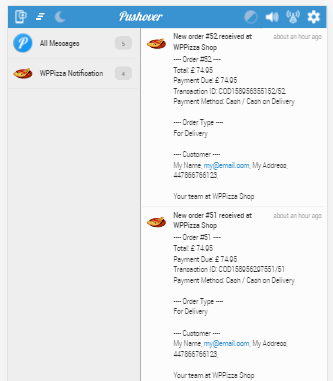
|