WPPizza – Paypal Standard Gateway
Description
PayPal Gateway for WPPizza – Enables PayPal payments for orders using the WordPress WPPizza Plugin.
Includes “PayPal Checkout” as an alternative option to the standard redirect
Requirements
- WPPizza 3.10, 3.11.1+ Recommended
- You MUST (obviously) have a PayPal account
- iConv (enabled by default on most servers)
Note
- To have “standard” credit card payments available at the normal PayPal guest checkout, credit card acceptance has to be activated in your PayPal account
- As with normal “redirect” implementations, guest checkout (i.e using credit cards) may not always show up in all cases due to fraud prevention and other measures controlled entirely by PayPal
Installation
- Install by uploading the zip file in the normal wordpress manner from withing the plugin screen (add new->upload) and activate
- Go to WPPizza -> Gateways and set options as required
- If you want to offer the ability for customers to pay by credit card without a PayPal account or having to login to PayPal, you need to enable “guest checkout” in your PayPal account (Note: this might not be available for all countries)
Setup : *NOT* using “Paypal Checkout” (Payment taken at PayPal)
- In the PayPal setting under WPPizza -> Gateways enter your PayPal account email address in “[Live] Paypal email address”
- Goto “Instant Payment Notification (IPN)” at https://www.paypal.com/merchantnotification/ipn/preference – logging into your PayPal account as necessary using the same email address you have entered in “[Live] Paypal email address” above
- Click on “Edit Settings” and enter https://[yourdomin]/?wppizza-listener=paypalipn as Notification URL (changing [yourdomin] as applicable) , enable “Receive IPN messages (Enabled)” and save.
- To ensure that the redirection back to your website after payment works when PayPal is failing to do so (as is the case at time of writing) go to https://www.paypal.com/businessmanage/preferences/website, set “Auto return” to “On” enter https://[yourdomain]/?wppizza-listener=paypalreturn in the “Return Url” field replacing [yourdomain] with your domain and save.
- Set all other options on that page as you wish.
- For sandbox/test settings enable “Sandbox ? (Y/N)” and change all ‘https://www.paypal.com/….’ links above to ‘https://www.sandbox.paypal.com/….’ and use your sandbox PayPal email address in “[Sandbox] Paypal email address”.
Setup : using “Paypal Checkout” (Payment taken on your site)
- The current “Howto” document at PayPal can be found here
- In Summary:
- As above, enter your PayPal account email address under “WPPizza -> Gateways” in the “[Live] Paypal email address” field
- Goto “API Credentials” in your developer account at https://developer.paypal.com/dashboard/applications/live – logging into your PayPal account as necessary using the same email address you have entered in “[Live] Paypal email address” above
- Click on “Create App”.
- Enter an App Name (Something like “WPPizza Live” for example) and click “Create App”.
- Once that App has been created, make a note of the “Client ID”, “Secret key” and “Primary Email” (likely to be the same as the email you have logged in with and entered in “[Live] Paypal email address”)
- Without logging out, go to https://developer.paypal.com/dashboard/applications/sandbox and create credentials for your sandbox account the same way as above.
- Enter the “Client ID”, “Secret key” and “Primary Email” (Live), “Client ID”, “Secret key” and “Sandbox account info: Email” (Sandbox) into the corresponding fields in your PayPal plugin settings in WPPizza->Gateways.
- Use the “Sandbox (Y/N) ?” checkbox to toggle the visibility of the “Live” / “Sandbox” fields.
- Save
Setup : Refunds
- If you would like to be able to refund orders directly from within the order history you will need to enter the relevant API credentials.
- Login to your PayPal account
- Go to https://www.paypal.com/businessmanage/credentials/apiAccess
- Click on “Manage API credentials” under “NVP/SOAP API integration (Classic)” (Screenshot)
- If asked – select “Request an API signature” and click “Agree and Submit”
- The following page will give you “Api Username”, “Api Password” and “Signature” (Screenshot)
- Click on “Done”
- Check the “Enable Refunds ? (Y/N)” checkbox in PayPal Gateway options in “WPPizza -> Gateways” in your WordPress administration
- Enter “Api Username”, “Api Password” and “Signature” you have obtained in the previous steps above into the corresponding fields.
- Save
- To obtain Sandbox credentials, login to your sandbox account instead , and go to https://www.sandbox.paypal.com/businessmanage/credentials/apiAccess, then follow the same steps
Setup : Other
- Set all other plugin options as you require.
Info and Troubleshooting
Screenshots – (click for larger versions)
admin panel/options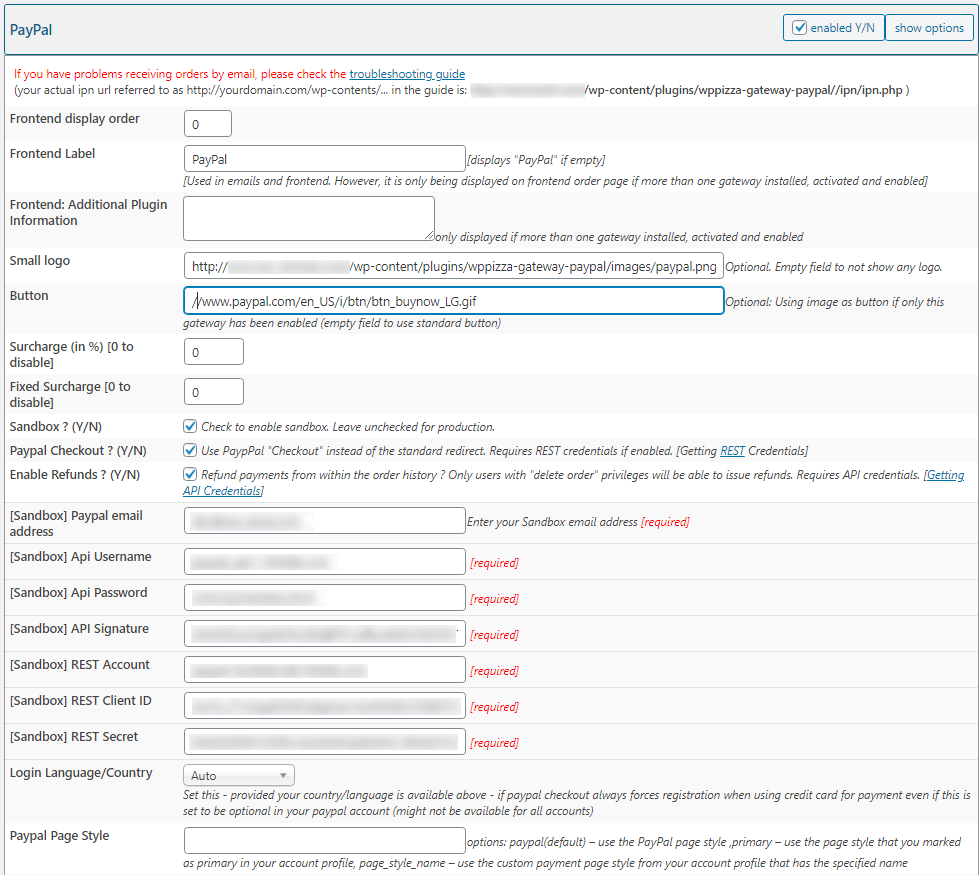
|