WPPizza – Goodcom Printer
Description
– WPPizza extension to allow “Goodcom” printers to accept/reject orders, intercepting the standard WPPizza order process
– Requires WPPIZZA 3.8.2+, WPPizza Confirm|Reject|Notify 1.3+, a Goodcom printer.
– If your payment gateway supports it, orders that are rejected by the printer will automatically be refunded if they were prepaid, else an email will be send to the shop reminding them to actually refund the payment from within their payment gateways account.
– Also takes “Delivery by Postcode”, “Add Ingredients” and other relevant extensions into account.
Important
- This is NOT a standalone plugin, but an extension to the Wppizza – Confirm|Reject|Notify plugin.
- I.e additionally to WPPizza (of course) v3.8.2+ it also requires WPPizza – Confirm|Reject|Notify v1.3+ or higher and – naturally – a Goodcom Printer
Requirements
- WPPizza 3.8.2+
- WPPizza – Confirm|Reject|Notify v1.3+
- A Goodcom Printer
Plugin Installation
- If you have not done so yet, install and configure the WPPizza – Confirm|Reject|Notify Extension as described here
- Then install the “WPPizza – Goodcom Printer” plugin by uploading the zip file in the normal wordpress manner from withing the plugin screen and activate
- In your admin , go to the WPPizza->C,R,N and enter username, password etc as per setup instructions below
Plugin/Printer Setup – Using WiFi (periodically polling the server for new orders)
- Login to your printer settings using your printer Terminal Id here
- set “ResID” (field 5) to be “wppizza-goodcom” (without the quotes)
- set “Center platform number” (field 4) to be “00”
- set “USSD” (field 7) to be “00”
- set “Port” (field 9) to be “80” or “443” if you are using SSL/HTTPS (or the appropriate port if you have a non-standard setup)
- set “Reject Reasons” (field 15) options as appropriate, separated by colon (See “Other Notes” below)
- set “Connection Mode” (field 22) to “00”
- set “GPRS/3G auto check interval” (field 26) to something sensible in seconds (like 30 for example). Should probably be lower than “Timeout” (field 64)
- set “Accept Reply Type” (field 31) to “01”
- set “File Path” (field 36) – to be the root url of your website including http[s] and trailing slash: – e.g. “https://www.my-domain.com/” (see also “Other Notes” below)
- set “Callback Url” (field 37) – to be the root url of your website including http[s] and trailing slash: – e.g. “https://www.my-domain.com/” (see also “Other Notes” below)
- set “Second Confirm” (field 41) to “00”
- set “Accept Items” (field 53) minutes options you want to offer as appropriate, separated by colon.(See Notes below)
- set a “Login Web UserName” (field 58) – “a-zA-Z0-9_-” characters only please
- set a “Login Web Password” (field 59) – “a-zA-Z0-9_-” characters only please
- set “Timeout” (field 64) to something like “60” (seconds). Should probably be higher than “GPRS/3G auto check interval” (field 26)
- set “SelectFonts” (field 52) to be “00”
- Set all other fields – such as WIfI settings etc – as required according to your printer documentation and apply/upload your changes to the printer
- upload one of the xml files you find in the
[plugins-path]/wppizza-goodcom-printer/xmldirectory to the printer. See screenshots below as to what the initial layout will look like depending on the xml used. For adjustments to your requirements use the filters further down on tis page - goto
WPPizza -> C,R,Nin your WordPress admin and scroll down to the “Goodcom” settings - Set “Enabled” to be checked
- set “Printer Notifications” to be “Using WiFi”
- set the “Login Web UserName” and “Login Web Password” equivalent to the settings entered in field 58 and 59 of your printer settings
- Leave the “Shop Confirmation” message enabled for now (see “Other Notes” below)
- Save
- amend localization strings (frontend, emails etc) by navigating to the “Localization” options (Tab at the top) of the plugin and set as required. Refer to the “help screen” for more info and template variables
- See also screenshots below for some visual examples
Note: some of the above is guesswork as the goodcom documentation is somewhat sparse, but the above values have been tested and work with a gc30. other goodcom printers might have slightly different parameters and you will have to refer to your particular printers documentation (if you can find it)
Plugin/Printer Setup – Using SMS (new orders being actively sent to the printer by SMS)
- Setup printer fields as above, but with the following differences
- set “Connection Mode” (field 22) to “01”
- Setup plugin setting as above, but change
- “Printer Notifications” to be “By SMS”
- Furthermore, set your SMS Gateway settings as appropriate for your chosen SMS gateway and enter the printers sms/phone number into the “SMS – Sender Phonenumber” field.
Other Notes
- Make sure you leave a space after the minutes integer in field 53 of the printer settings.
– e.g “15 Minutes;30 Minutes;45 Minutes;60 Minutes” etc (See Screenshot). - If you are using the Wppizza Preorder Plugin, also add an “ASREQUESTED” option (i.e “15 Minutes;30 Minutes;45 Minutes;60 Minutes;ASREQUESTED”)
- If you do NOT enable “Shop Confirmation” in WPPizza->C,R,N->Settings : Goodcom Printer”, orders will always be send to the customer as being accepted (with estimated delivery/pickup times), even if the printer has not yet processed the order. However, if you subsequently “Reject” the order with your printer, the customer will still be sent an email to that effect (and any payment refunded if your gateway supports it)
- Before an order has been accepted, the estimated times displayed are based on your “Preparation Time” and “Delivery time” as set in WPPizza -> Order Settings
- If you are using the Wppizza Preorder Plugin, you should reply to any orders that are set to be “ASAP” with an accept time. If you want to accept a preorder time requested, accept the order with the “ASREQUESTED” option set in field 53 of your printer (see above)
- Multisite setups: “File Path”/”Callback Url” (fields 36/37) – in a multisite environment – should include the path to the subsite, or use subdomain – as appropriate
Troubleshooting – WiFi
- double check your printer configuration settings according to the instructions above
- enable debug in the plugin and do a dummy order
- you will find a log file in [path]/plugins/wppizza/logs/goodcom-printer-debugall-[xyz].log
- if you do NOT find anything in that file that looks like
[a] => wppizza-goodcom [u] => abcd [p] => wxyz, the printer is not polling the server and you ‘ll have to check your printer settings again or ask goodcom for support for your particular printer as to why it’s not polling - WHEN YOU ARE DONE, DISABLE DEBUG AND DELETE THE LOG ABOVE AS IT MIGHT HAVE LOGIN INFO FROM YOUR PRINTER (although for added security the wppizza/logs directory is generally not accessible publicly)
- the url the printer connects to
http://www.my-domain.com/?a=wppizza-goodcom&u=myusername&p=mypassword, changing domain/url, username and password according to your printer settings (fields 36, 58, 59)must NOT be cached - .. further info will be added here as i find out about things. ..
Previewing Print Output
- open the GsmXmlFormat.exe program that came with your printer (If you do not have a copy of that program, please contact goodcom)
- Select “File->Open” and select one of the xml files in the /xml/ directory of the plugin
- assuming you have enabled the plugin with all the relevant settings, make a (dummy) order.
- in your browser, go to
http://www.my-domain.com/?a=wppizza-goodcom&u=myusername&p=mypassword, changing domain/url, username and password according to your printer settings (fields 36, 58, 59) - the output will be something like
#1_689* ...............VARIOUS DATA PARAMETERS...................*#(Example Screenshot) - copy/paste everything between (and including) the #’s into the top right field of the GsmXmlFormat.exe program (Example Screenshot) to view a virtual printout as it would be printed with your settings
- if you want to check any custom filter settings, simply edit the filters as required, refresh the
http://www.my-domain.com/?a=wppizza-goodcom&u=myusername&p=mypasswordurl and re-copy/paste the new output into the GsmXmlFormat.exe now
Testing accepting an order without the printer
- make an order
- in your browser, go to
http://www.my-domain.com/?a=wppizza-goodcom&u=myusername&p=mypassword, changing domain/url, username and password according to your printerssettings (fields 36, 58, 59) - the output will be something like
#1_689* .....VARIOUS DATA PARAMETERS.....*# - make a note of the order id. in the above example, this would be
1_689 - to simulate *accepting* this order you need to set the “o” (orderid), “ak” (set to “accepted”), “m” (accepted time – as one of the defined values in field 53 “Accept Items” of your printer settings), “dd” (current date – YYYYMMDD format) and “dt” (current time HH:ii:ss) parameters as appropriate
- so an example url for *accepting* this order would be something like
http://www.my-domain.com/?a=wppizza-goodcom&u=myusername&p=mypassword&o=1_689&ak=accepted&m=10_Minutes&dd=20200513&dt=16:11:12
changing domain/url, username and password as appropriate again - emails etc will now be sent as appropriate
Testing rejecting an order without the printer
- make an order
- in your browser, go to
http://www.my-domain.com/?a=wppizza-goodcom&u=myusername&p=mypassword, changing domain/url, username and password according to your settings (fields 36, 58, 59) - the output will be something like
#1_689* .....VARIOUS DATA PARAMETERS.....*# - make a note of the order id. in the above example, this would be
1_689 - to simulate *rejecting* this order you need to set the “o” (orderid), “ak” (set to “rejected” here), “m” (rejection reason – as one of the defined values in field 15 “Reject Reasons” of your printer settings), “dd” (current date – YYYYMMDD format) and “dt” (current time HH:ii:ss) parameters as appropriate
- so an example url for *rejecting* this order would be something like
http://www.my-domain.com/?a=wppizza-goodcom&u=myusername&p=mypassword&o=1_689&ak=rejected&m=OUT_OF_STOCK&dd=20200513&dt=16:11:12
, changing domain/url, username and password as appropriate again - emails etc will now be sent as appropriate
Filter examples to adjust print layout
Please refer to the documentation here.
Support
For additional support please visit the “Support Forum”
Screenshots
|
default print using wppizza-goodcom-default.xml |
selected right align using wppizza-goodcom-selected-right-align.xml |
no align using wppizza-goodcom-no-align.xml |
|
default print – with filters using wppizza-goodcom-default.xml |
filters – info 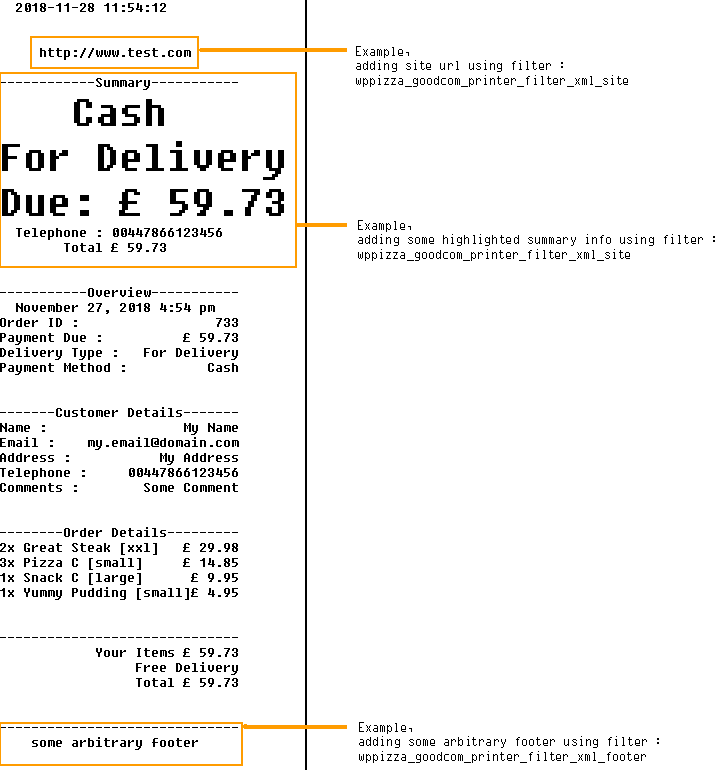
|
printer settings – example WiFi |
|
plugin settings – WiFi |
plugin settings – SMS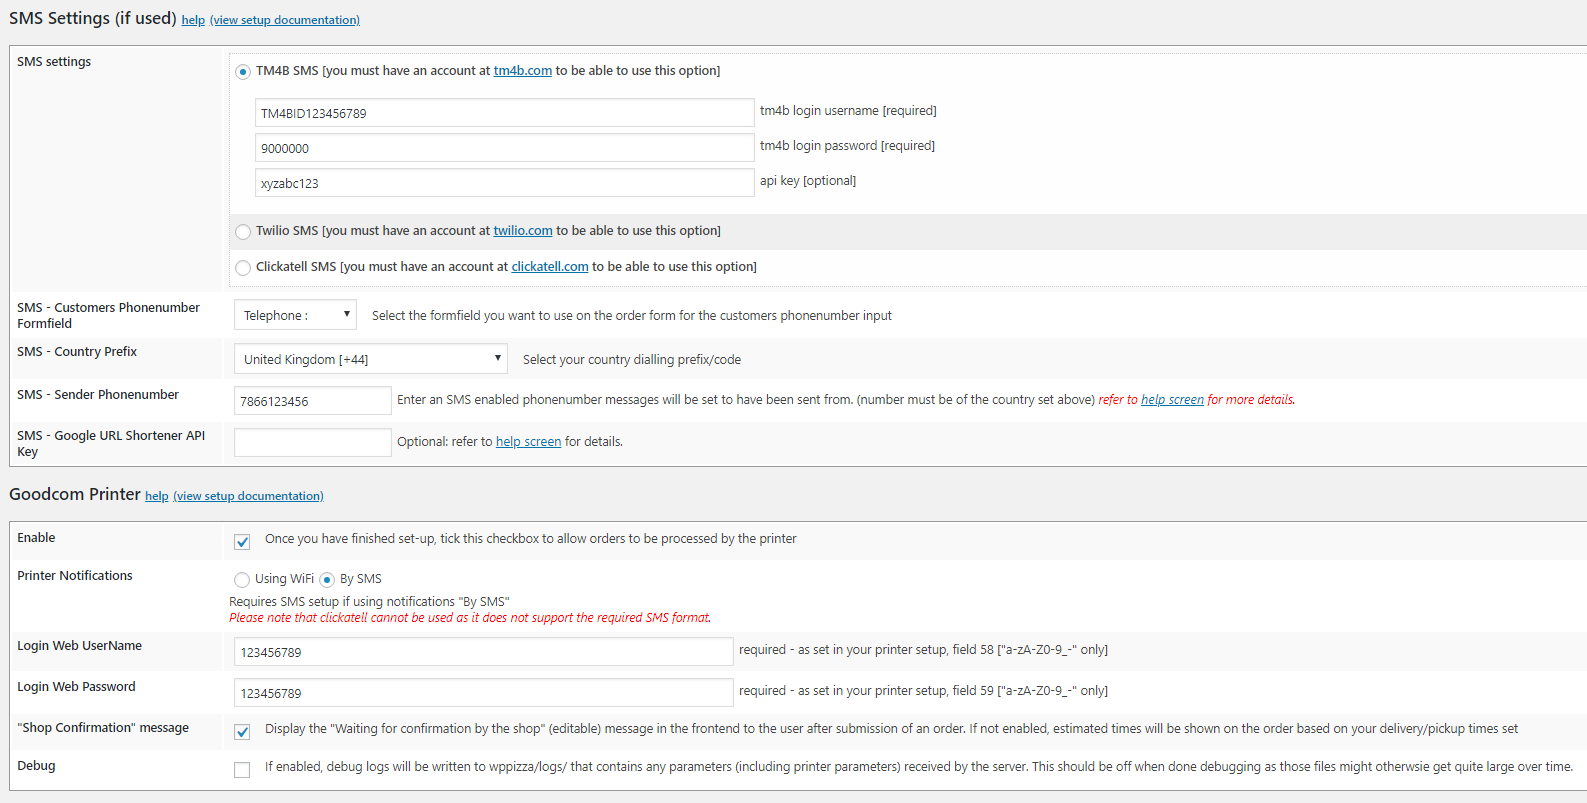
|