WPPizza – Mailinglists
Description
- An extension for WPPizza that adds a “subscribe to newsletter” (editable text) checkbox option to the order/checkout page to allow your customers to subscribe to one (or several) of the supported mailing lists when ordering from your shop.
Supported mailinglists
- ActiveCampaign
- aWeber
- Freshmail
- GetResponse
- Mailchimp
- MailPoet (v3)
- Sendy
- The Newsletter Plugin
- Wysija (MailPoet – v.2)
Requirements
- WPPIZZA 3.7+
- cUrl (typically available by default on most servers)
- an account – and their required software (if any) – with the supported mailing list provider you would like to use
Installation
- install by uploading the zip file in the normal WordPress manner from within the plugin screen and activate
- set required options under WPPizza->Order Settings->Mailinglists
- if you so wish, the selected choice can be made available/displayed in emails and/or print templates by going to “WPPizza->Templates” and enable it as required
Setup – ActiveCampaign
- Login to your ActiveCampaign Account at https://www.activecampaign.com
- Go to “Settings->Developer” (url to get there will be something like https://[myaccountname].activehosted.com/admin/main.php?action=settings#tab_api)
- Make a note of your “API Access->Url” and your “API Access->Key” on that page
- Go to WPPizza->Order Settings in your WordPress site
- Scroll down to “Mailinglists”
- Tick the checkbox next to “ActiveCampaign”
- Enter the Url and Key from your ActiveCampaign account into the “ActiveCampaign URL” and “ActiveCampaign API Key”
- Save page for a selection of your lists to become available
- Select from one the available lists in the dropdown you wish to add subscribers to
- Optionally – if enabled on your WPPizza checkout page – select your “Customers Name” formfields as appropriate. (Address | Phone are not being used by ActiveCampaign)
- Save
Setup – aWeber
- Go to WPPizza->Order Settings in your WordPress site
- Scroll down to “Mailinglists”
- Tick the checkbox next to “aWeber”
- Click on the “get Authorization Code” link
- Enter your aWeber Login and Password and click on “Allow Access”
- Copy the authorization code you will receive in the subsequent page
- Enter this (one-time) authorization code into the relevant field in the aWeber settings of the plugin and save
- Select from one the now available lists in the dropdown you wish to add subscribers to
- Optionally – if enabled on your WPPizza checkout page – select your “Customers Name” formfields as appropriate. (Address | Phone are not being used by aWeber)
- Save
Note: If you get a new authorization code, you must enter this new authorization code into the relevant field in the aWeber settings of the plugin and save to generate the right access credentials. Newly created mailinglists in your aWeber account might take up to 30 minutes to be available for selection in the plugin’s admin screen
Setup – Freshmail
- Login to your Freshmail Account at https://app.freshmail.com/en/auth/login
- Click on “Subscribers” https://app.freshmail.com/en/lists/index/ and click on one of your lists available or create a new one
- Select one of the lists and click on “Parameters”. Make a note of the displayed “API Key” and “API secret key” (you do *not* need the “List’s API key” for setting up the plugin)
- Go to WPPizza->Order Settings in your WordPress site
- Scroll down to “Mailinglists”
- Tick the checkbox next to “Freshmail”
- Enter your “Freshmail API Key” and “Freshmail Api Secret Key”
- Save the page for a selection of your lists to become available
- Select from one the available lists in the dropdown you wish to add subscribers to.
- Save
Setup – getResponse
- Login to your getResponse Account at https://www.getresponse.com/
- Go to https://app.getresponse.com/api to generate an Api Key if you have not done so already
- Make a note of your Api Key – you will need this below
- Go to WPPizza->Order Settings in your WordPress site
- Scroll down to “Mailinglists”
- Tick the checkbox next to “GetResponse”
- Enter your GetResponse API Key
- Save page for a selection of your lists to become available
- Select from one the available lists in the dropdown you wish to add subscribers to
- Optionally – if enabled on your WPPizza checkout page – select your “Customers Name” formfields as appropriate. (Address | Phone are not being used by getResponse)
- Save
Setup – Mailchimp
- Login to your Mailchimp Account at https://mailchimp.com/
- Click on your name (typically top right) , select “Account”
- In the following page select “Extras -> Api Keys”
- If you have not created an API Key yet, do so
- Make a note of your Api Key – you will need this below – and ensure the “Status” is set to be enabled
- For more detailed info regarding API Keys please see here
- Go to WPPizza->Order Settings in your WordPress site
- Scroll down to “Mailinglists”
- Tick the checkbox next to “Mailchimp”
- Enter your Mailchimp API Key
- Save page for a selection of your lists to become available
- Select from one the available lists in the dropdown you wish to add subscribers to
- Optionally – if enabled on your WPPizza checkout page – select your “Customers Name | Address | Phone” formfields as appropriate
- Save
Note: “Double opt-in” will be used according to the settings in you Mailchimp account (“Lists”->[some list]->”Settings”->”List Name and defaults”) for the selected list.
Setup – Sendy
- Go to WPPizza->Order Settings in your WordPress site
- Scroll down to “Mailinglists”
- Tick the checkbox next to “Sendy”
- Enter your Sendy installation URL (without trailing slash)
- Enter your Sendy list ID (Can be retrieved from Sendy’s “View all lists” page)
- Save
Setup – Newsletter
- Download and Install the newsletter plugin from here (or install using the normal wordpress plugin installation procedure)
- Once installed and activated, go to Newsletter->AddOns and install and activate the AddOns manager as per their documentation (you will need to get a free license key from the newsletter site)
- With the Addons Manager active, also install the free “Newsletter API” addon from that “AddOns” page
- Now go to Newsletter->Api and click on “Create Key” (make sure your are creating keys for API v2)
- Make a note of the generated “client key” and “client secret”
- In WPPizza->Order Settings , scroll down to “Mailinglists”
- Tick the checkbox next to “The Newsletter Plugin”
- Enter the client key and client secret as generated above into the relevant fields
- Select from one of your available lists. Important: The salected list MUST be set to be “Public” in the settings for this list in the Newsletter plugin
- Save and you are done
Setup – Wysija / Mailpoet (Mailpoet v2)
- Make sure you have the WordPress mailpoet and/or Wysija plugin installed (Mailpoet 3 / Wysija [Mailpoet 2])
- Go to WPPizza->Order Settings in your WordPress site
- Scroll down to “Mailinglists”
- Tick the checkbox next to “Mailpoet” and/or “Wysija / MailPoet 2” – These will only be available if the plugins themselves have been installed and are active
- Select from one the available lists in the dropdown you wish to add subscribers to
- Optionally – if enabled on your WPPizza checkout page – select your “Customers Name” formfields as appropriate. (Address | Phone are not being used by Mailpoet)
- Save
Screenshots (click for larger versions)
admin settings options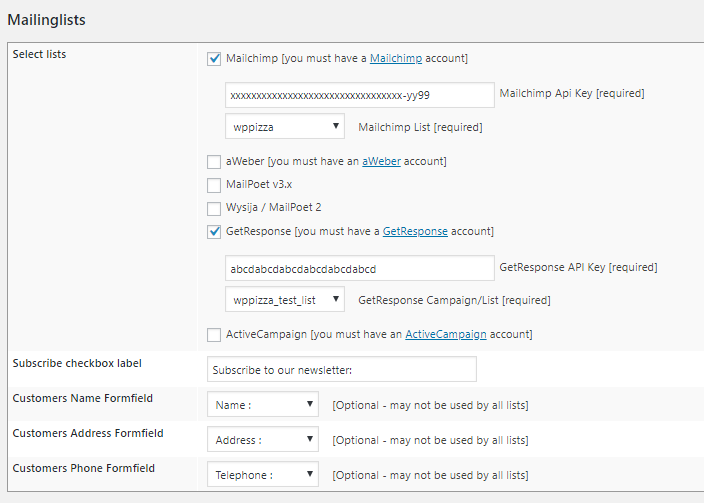
|
frontend “Subscribe to newsletter” checkbox on checkout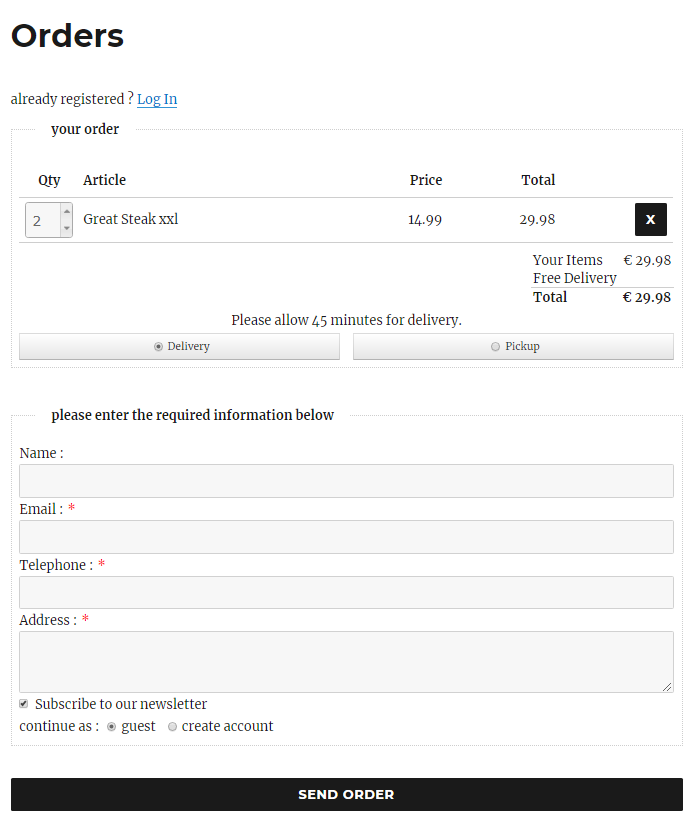
|